
JPEG? RAW? TIFF? GIF? PNG? There are many image file formats when it comes to digital photography, and it's not always easy to know how and when to use each of them. In this article, each of the most common file format is explained, and an easy hands-on guide is provided!
Vector vs. Raster image file formats
Vector images contain the colour information in a vectorial form, they are mostly used in graphic design.
Raster images contains the colour information on a pixel-based structure, with a total number of pixels in vertical and horizontal direction, and three colour component for each pixel (RGB)
Digital Photography works with Raster Image File Formats, which will be discussed in this article.
Image File Formats: to Be or Not to Be... compressed
Compression is a process applied to digital images that reduces drastically their size in terms of data (file size). It is actually a very complicated process, but it may be thought of as an averaging of the colour information among pixels. After compression an image will have the same total number of pixels, but those pixels whose colours were close in the uncompressed image, will have exactly the same colour in the compressed image. Again, the process is much more complicated than that, but this easy explanation gives a good idea of what compression is.
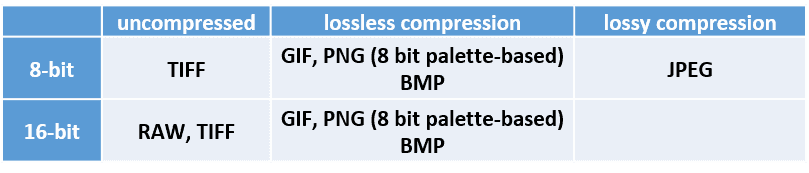
- Image file formats like RAW and TIFF are UNCOMPRESSED.
- Image file formats like GIF, PNG, and BMP are LOSSLESS COMPRESSED (no information is lost).
- Image file formats like JPEG is LOSSY COMPRESSED (information is lost)
Uncompressed Image File Formats
RAW format
RAW is not, strictly speaking, a format, as it does not indicate a structure that would allow for the arrangement of data. It is a general term for certain files provided by cameras and scanners, with minimal processing of the data. Indeed, while a JPEG file provided by a camera contains a number of treatments (white balance, noise corrections, contrast, among others), the RAW equivalent will not contain them, and for this reason, RAW data can be considered closer to what the sensor has recorded. RAW files are not viewable, and to do this you must "develop" them, using dedicated software (such as Raw Camera, or Lightroom, among others). Thus, the RAW format is proposed as a metaphorical equivalent of what in film would be a negative without developing.
The name RAW comes from the English word raw, which means not cooked, not ready to consume, or that still needs processing in order to be used.
Each manufacturer has its own extension to indicate its RAW files. Nikon, for example, uses the .NEF extension, while Canon uses the .CR2 extension. However, the RAW files from each manufacturer may vary for different camera models, even though the RAW files have the same extensions. For example, a .NEF from a Nikon D750 camera will not necessarily have the same format as a .NEF from a Nikon Coolpix.
There is a RAW format proposed by Adobe, the .dng format, which is proposed as a "RAW universal" format. Adobe provides free software that can transform almost all RAWs (from different cameras) into a .dng file: Adobe Digital Negative Converter.

Most RAW files contain a short header indicating the system according to which pixel data is arranged in the file, as well as the "metadata" of the sensor (its size, color profile). Then there is the metadata of the image: camera model, lens type, author, date of shooting, among others. Also, the RAW files contain a small format version of the image (thumbnail) as well as a full size JPEG file, which is used by the camera to show the image in the LCD screen. The RAW file also contains the sensor data.
Most of the raw formats are based around the TIFF structure, from which they deviate by introducing a special header, as well as encryption of part of the data.
--> Always shoot your pictures in RAW format!
--> Actually use RAW+JPEG. For each shot you will have two files: a RAW file (the real picture, to be developed), and a JPEG for quick visualisation purposes.
TIFF format
The TIFF (tagged Image File Format) was developed in 1987 by Adobe. It is an old graphic format, allowing to store images of important size, without loss of quality. This format allows to manage images in real colour, 32 bits per pixel, and it allows to use several color spaces, such as RGB, CMYK, CIE Lab, and YCrCb. The internal structure of a TIFF file depends on the tags used, which describe the characteristics of the images. This format allows the use of many types of compression, with or without data loss, it accepts many pixel encodings, from 1 to 64, bits per pixel. The TIFF format allows several images per file. Because it is a format without loss of information, it can be used as a working format, for images that will be saved, processed, then re-recorded, and so on. (the same process, save-process-processing-recording, etc, in jpeg, can degrade the image very strongly).
It is a format widely used in applications, scanners and printers. This format is useful when you want to print in large format, however, due to the size of the TIFF files, it is not suitable for the web, or for sharing photos digitally (without printing).
The structure of a TIFF file starts with the two characters "MM" (for big endian) or "II" (for little endian), and the next two bytes represent 42, in big endian or little endian. Historically, images in TIFF format were limited to a size of 4 GB, but since 2007 the tiffs are able to handle larger images.
(TIFF format also may be compressed by the way, but is really interesting when it is uncompressed, we will see why)
Supported Bit Depth for TIFF format: 8 and 16 bit sRGB, 32 bit linear float.
- Use TIFF format when you are going to edit/save/edit/save/edit/etc an image
- Use TIFF in 16bits if you are going to edit your image frequently and heavily!!
Lossless compressed image file formats
GIF format
GIF stands for "Graphics Interchange Format" and is a format developed by CompuServe in 1987, based on a lossless algorithm that is much more efficient than the algorithm used by BMPs. A special feature of GIF is the number of colours supported: 256 from the RGB palette (16 million shades): this means that GIF format is not a good format when working in photography. The GIF allows to store several images in a file, which makes it possible to create slide-shows, see animations if the images are displayed at a fast enough rate. In 1994 the owner of the patents for LWZ compression suddenly announced that the use of GIF images and the production of these would be subject to royalties: this was the origin of the creation of the PNG format. But, as of 2006, the GIF format is in the public domain. Nowadays, we are living in a period of great growth for the gif image: databases with thousands of GIFs offer communication supports, used more and more in social networks in order to outbid the expressiveness of the messages.
Supported Bit Depth for GIF format: 8 and 16 bit sRGB, 8 bit Palette-based.
PNG format
This format (Portable Network Graphics), was created to replace the GIF format, whose compression was subject to a patent. Like the TIFF format, the PNG format is a lossless format, suitable when the image contains flat colours: synthetic images for the web, icons …
PNG the same as GIF, can only consider 256 colons, which make this format interesting for internet, but not really when working with digital photography.
A special feature of this format is that it supports transparencies: the presence of an alpha channel defines different levels of transparency and makes it ideal for compositing on web pages (where images can overlap). The PNG format exceeds the GIF format as far as still images are concerned, however, it cannot support animations like the GIF format.
Supported Bit Depth for PNG format: 8 and 16 bit sRGB, 8 bit Palette-based.
BMP format
This image file format was developed by Microsoft in order to become system independent. It is a lossless file format associated to large file sizes. This format is almost not used any more in photography.
Supported Bit Depth for BMP format: 8, 16, ..., 32 bits.
Lossy compressed Image File Formats
JPEG format
JPG/JFIF (Joint Photographic Experts Group/JPEG File Interchange Format) is a very popular image format. While JFIF is actually the format, JPG is the compression method. This format, due to its small size, is suitable for quickly transmitting images over the web, and saving them. On the other hand, it is a compressed format, i.e., the quality of the image is degraded compared to other formats (such as TIFF for example). Compression can be done at different levels, low compression will result in better image quality (and a larger file size) while high compression will result in very small files, with an image quality that can range from poor to unacceptable. The JPEG format is provided by most existing digital cameras, in addition to the RAW format for some cameras, o directly as the only format provided by the camera.
JPG compression works with information that is least visible to the eye. It is performed in six steps. First, during the first step of "colour transformation", an algorithm averages the information of the contiguous pixels, taking into account the fact that the human eye is very sensitive to luminance, but very little to chrominance. Subsequently, a chrominance sub-sampling operation reduces the size of several chrominance blocks into a single block. A cut in blocks is followed by a complex operation called "DCT Transform", a "Quantization" process and a "RLE and Huffman Coding".
Unlike the GIF format, the JPEG format does not support transparency effects.
The JPEG format has become a standard for recording digital camera data. Also, it is the format requested by most printers of consumer digital images.
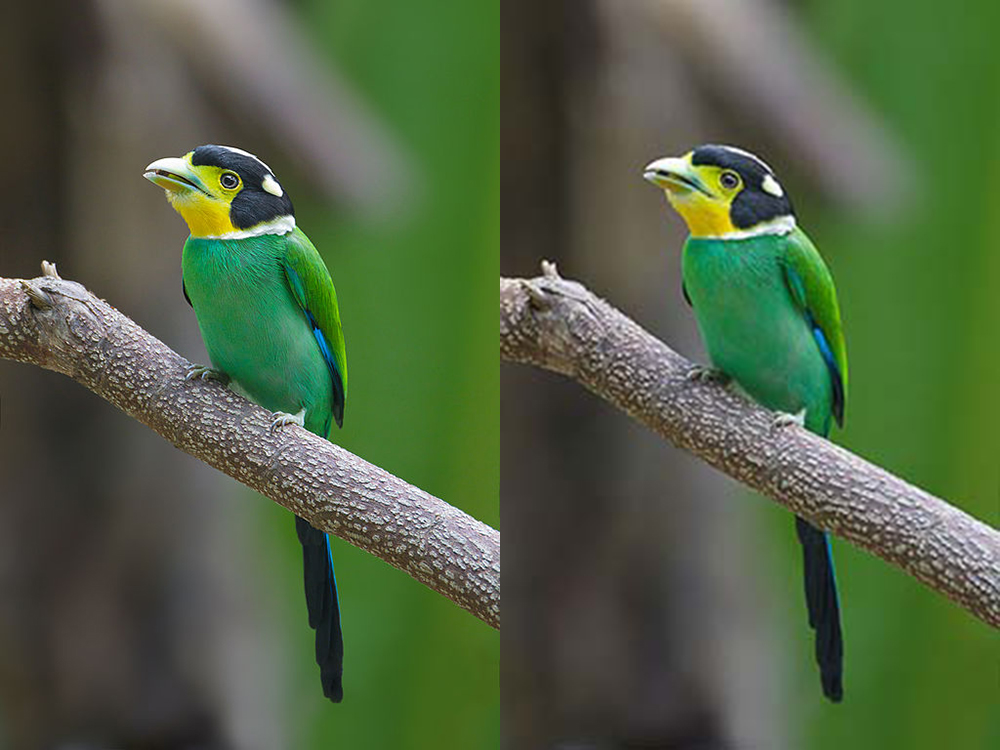
When the compression of the image is low, the quality of the image can be very important. However, beyond a certain level, the compression can become visible, and cause the appearance of colour patches that denaturalize the image, as shown in the following figure (uncompressed vs. compressed).
--> Never work in JPEG if you are going to edit and save your image several times!!!
Supported Bit Depth for JPEG format: 8 bit sRGB.
16-bits or 8-bits for image file formats?
If you are going to extensively edit your pictures, once and again, now and then, several times, then work in 16-bits!! Otherwise you can afford working in 8bits. Keep in mind that JPEG format only accept 8-bit colour depth, so if you plan to edit heavily and frequently your images then use TIFF format.
You can find a more detailed general table in THIS LINK.
Working with Image Files Format
With our apologies, we are going to be radical here... but here we propose you a multi-use general workflow that will keep you most of the time far for problems.
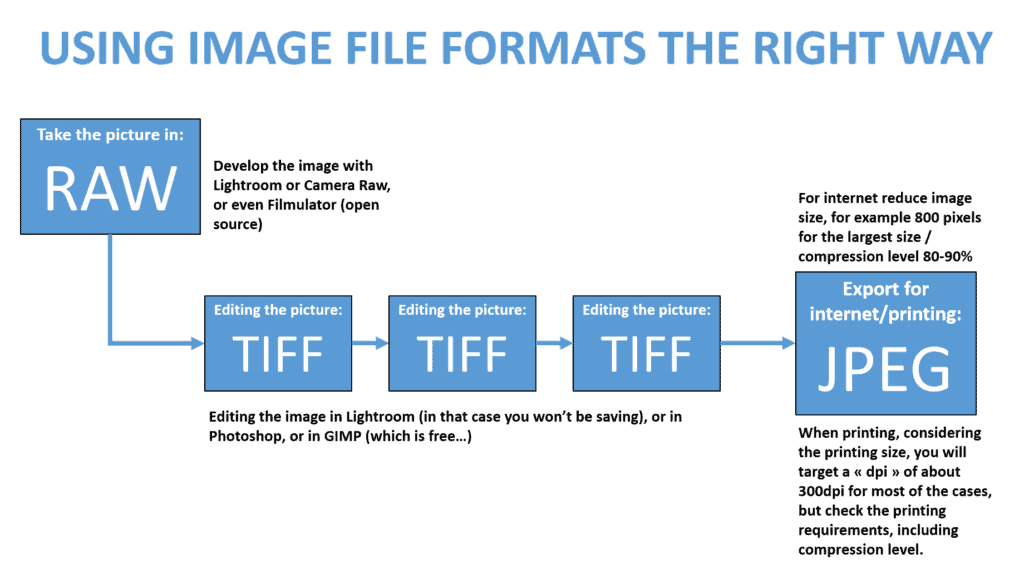
When taking pictures: USE RAW FORMAT! And if your photo camera does not offer a RAW format, then consider changing your photo camera! Why? Well, when you have a RAW file for an image, then you can develop it yourself, that's to say: you will decide how much noise reduction you will apply, you will set the white balance... and you will be able to produce a descent TIFF image in order to start editing it.
When editing images: USE TIFF FORMAT! Why? because you may be editing the image, and then saving it, and then editing it further again, and re saving it, and etc. And if you work in a compressed format like JPEG, then each time you save the image it will re-compressed, which may cause degradation of the image on the long term.
When exporting to internet or for printing purposes: EXPORT YOUR IMAGE IN JPEG (for internet you will probably rescale the image to a smaller size, and for printing you will target a "dot per inch" as demanded by the printer, most of the time that would be around 300dpi. (Update: consider using the Google Webp format for your pages to be faster. In THIS LINK you can find a plug-in (WebPShop) that will allow Photoshop to save images in the Webp format)
However, when working with applications that have a native image file format, consider using those formats when possible. Last but not least, if you will be editing your images heavily, then consider working in 16bit !!! (Shoot the picture in RAW, develop and save as a TIFF (16bit) for editing purposes. The final export will always be JPEG 8bit!!
FAQ: Image File Formats – Everything You Need to Know
1. What are the main types of image file formats?
There are three main types:
- Uncompressed: RAW, TIFF (without compression, preserving all details).
- Lossless compressed: PNG, GIF (smaller file size without losing quality).
- Lossy compressed: JPEG (reduces file size but permanently loses some information).
2. What is the difference between vector and raster images?
- Vector images (SVG, AI, EPS) store graphics as mathematical shapes, making them scalable without losing quality (used in logos, icons).
- Raster images (JPEG, PNG, TIFF) are pixel-based and can lose quality when resized (used in photography).
3. Which format should I use for digital photography?
- RAW: Best for high-quality professional editing.
- TIFF: Best for image preservation and detailed editing.
- JPEG: Best for sharing, web, and printing.
4. Why is RAW not a standard image format?
RAW files are camera-specific and need processing. Each camera brand has its own RAW format (.NEF for Nikon, .CR2 for Canon), making them incompatible across software without conversion.
5. What is the biggest mistake people make with image formats?
Many people save and edit JPEG images repeatedly, which degrades quality over time. Instead, always edit in RAW or TIFF, and only convert to JPEG for final export.
6. When should I use PNG instead of JPEG?
Use PNG when:
✅ You need transparency (e.g., overlays, graphics).
✅ You want lossless quality for web images (e.g., icons, screenshots).
Use JPEG when:
✅ You need small file sizes for photography.
✅ You are sharing images on social media or websites.
7. Is TIFF outdated?
No! TIFF is still the best format for editing and preserving image quality. However, its large file size makes it impractical for web use.
8. What is the best format for printing?
✅ TIFF (16-bit) for high-quality professional printing.
✅ JPEG (300 DPI) for casual prints.
9. Is WebP better than JPEG?
Yes! WebP compresses images better than JPEG without losing quality and supports transparency. It is ideal for websites, making them faster to load.
10. Why does JPEG lose quality over time?
Each time you edit and save a JPEG, it gets compressed again, permanently losing detail. This is called generation loss.
11. What format should I use for Instagram and social media?
Use JPEG with:
- 1080px width (Instagram, Facebook)
- 80-85% quality setting (to reduce file size without visible loss)
12. What is the best format for professional editing?
✅ RAW (best flexibility and detail).
✅ TIFF (16-bit) (for editing without loss).
13. Can I convert JPEG to RAW?
No. Once a file is compressed into JPEG, lost information cannot be recovered. Always shoot in RAW if you need high-quality editing.
14. Should I always shoot in RAW?
Yes, if you want maximum control over your image. If you prefer quick, shareable photos without editing, JPEG is fine.
15. Is GIF a good format for photography?
No, GIF is limited to 256 colors, making it unsuitable for high-quality photos. It’s mainly used for animations and memes.
16. Is BMP still useful?
No, BMP is an outdated format with huge file sizes. Use TIFF or PNG instead.
17. What’s the best format for website images?
- WebP (best compression and quality).
- JPEG (good for photos).
- PNG (for images with transparency).
18. Should I use RAW+JPEG mode on my camera?
Yes! This way, you get:
- RAW (for editing).
- JPEG (for quick previews).
19. What is the best workflow for photographers?
1️⃣ Shoot in RAW.
2️⃣ Edit in TIFF (16-bit).
3️⃣ Export in JPEG (for web and print).
4️⃣ Use WebP for websites.
20. When should I use 16-bit vs. 8-bit color depth?
- 16-bit TIFF → When editing heavily (more color accuracy).
- 8-bit JPEG → When exporting final images (smaller file size).
Final Recommendations
✅ For photographers → Shoot in RAW, edit in TIFF, export in JPEG.
✅ For websites → Use WebP for faster loading.
✅ For editing → Work in 16-bit TIFF to avoid quality loss.
Sources
Introductory Digital Image Processing, Pearson Series, 2015.
Adobe Photoshop CC for Photographers, Martin Evening, 2018.
Adobe Photoshop Classroom in a Book, Andrew Faulkner, 2020.
Compressed Image File Formats: JPEG, PNG, GIF, XBM, BMP, John Miano, 1999.
https://helpx.adobe.com/photoshop/using/file-formats.html
Curated Videos on Image File Formats
Image file formats
Perfect for understanding the importance of a RAW file!!! :
Cool explanation but it begins in the wrong way, when you finished editing your picture, may be to late to start thinking about image file formats:
This piece of writing is truly a pleasant one!
That’s exactly what I was looking for! I’m shooting in RAW myself, but when you will be blogging and uploading images on social networks, shooting in jpeg can make it. I agree though with your general method when working with image file formats. Thank you!
That was the idea, to give a good for all situations methods, and for any image, if you have a RAW version, then you are free to reinterpret it whenever you want if you need it. Thank you for you comment Noah, stay around!
Excellent and succinct summary, thanks for writing and sharing. And the videos are a helpful bonus!