Photography is an art form that goes far beyond simply clicking a button to capture an image. It's a nuanced craft where the photographer's creative vision and technical skills converge to produce visually stunning and emotionally resonant photographs. One of the fundamental aspects that can make or break a photograph is composition. In this comprehensive guide, we will delve deep into the world of photography composition, offering insights, tips, and techniques to help you elevate your photography skills and capture compelling images that tell captivating stories.
Understanding Photography Composition
Photography composition is the cornerstone of creating visually engaging and emotionally resonant images. It is the art of arranging the elements within your frame to convey your message, evoke emotions, and tell a compelling story. Understanding the principles and techniques of composition is essential for any photographer looking to take their skills to the next level.
The Importance of Composition
Composition is not just about creating aesthetically pleasing images; it's about guiding the viewer's eye and controlling the narrative within a single frame. Think of your photograph as a canvas, and composition as the brushstrokes that shape it. A well-composed photograph draws the viewer in, invites them to explore, and leaves a lasting impression.
Visual Elements of Composition
To grasp the intricacies of composition, you must become familiar with the fundamental visual elements that make up a photograph:
- Lines: Lines can be literal, like roads or fences, or implied, created by the direction of a subject's gaze or the arrangement of objects. They guide the viewer's eye and add structure to your image.
- Shapes: Shapes are the building blocks of composition. They can be geometric, organic, or abstract, and their arrangement can create balance, tension, or harmony.
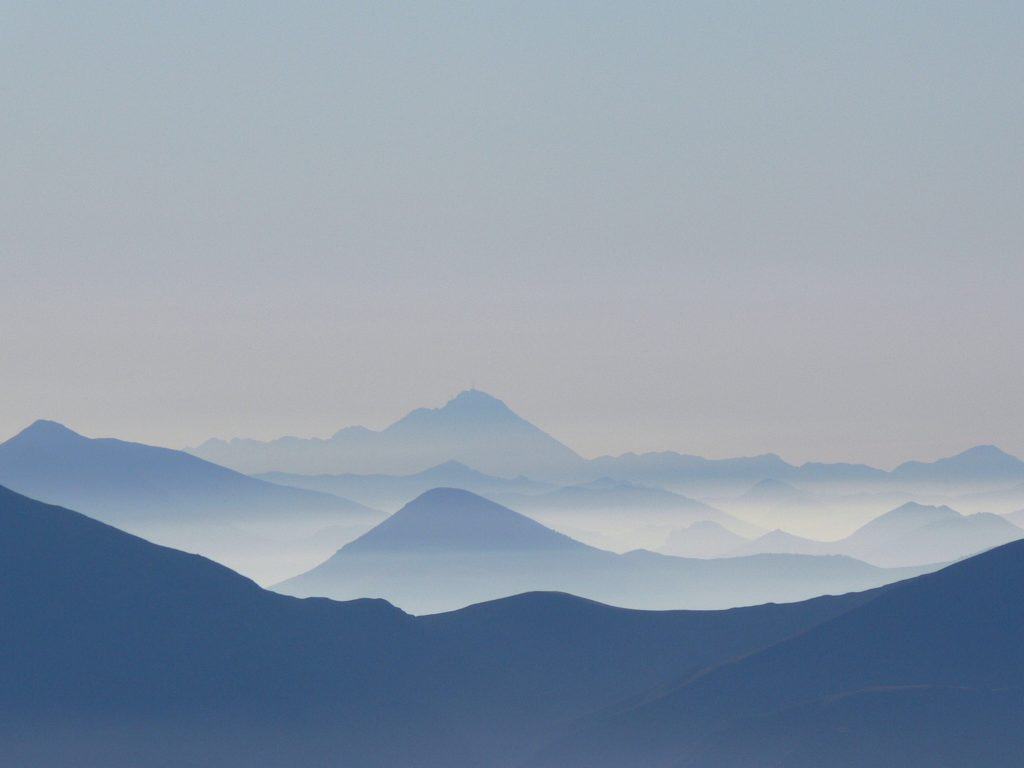
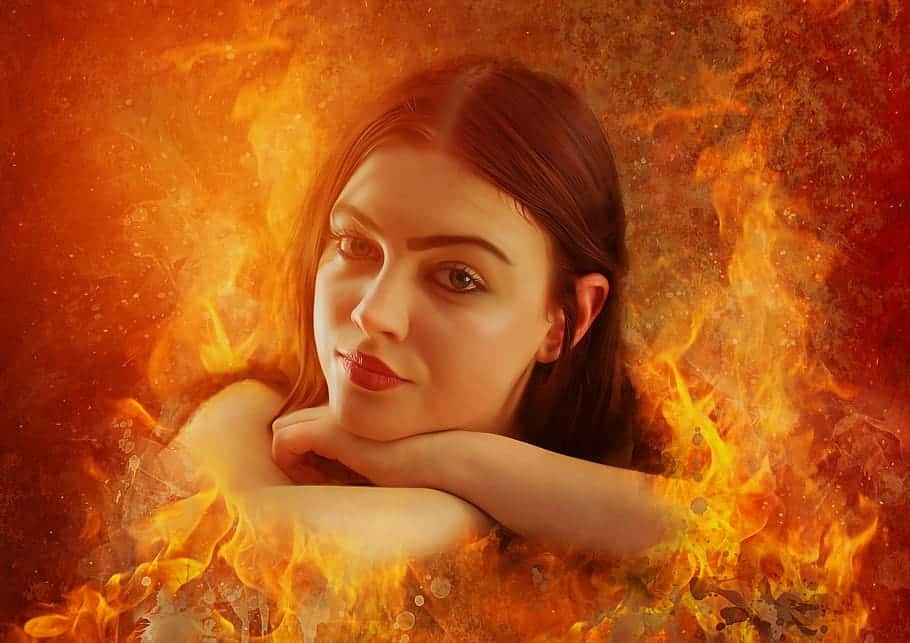
- Colors: The choice and combination of colors in your photograph can evoke specific emotions and set the mood. Warm colors like red and yellow may convey excitement or passion, while cool colors like blue and green can create a sense of calm or serenity.
- Textures: Texture adds depth and tactile quality to your photographs. Whether it's the rough bark of a tree, the smooth surface of a lake, or the delicate petals of a flower, textures can engage the viewer's senses.
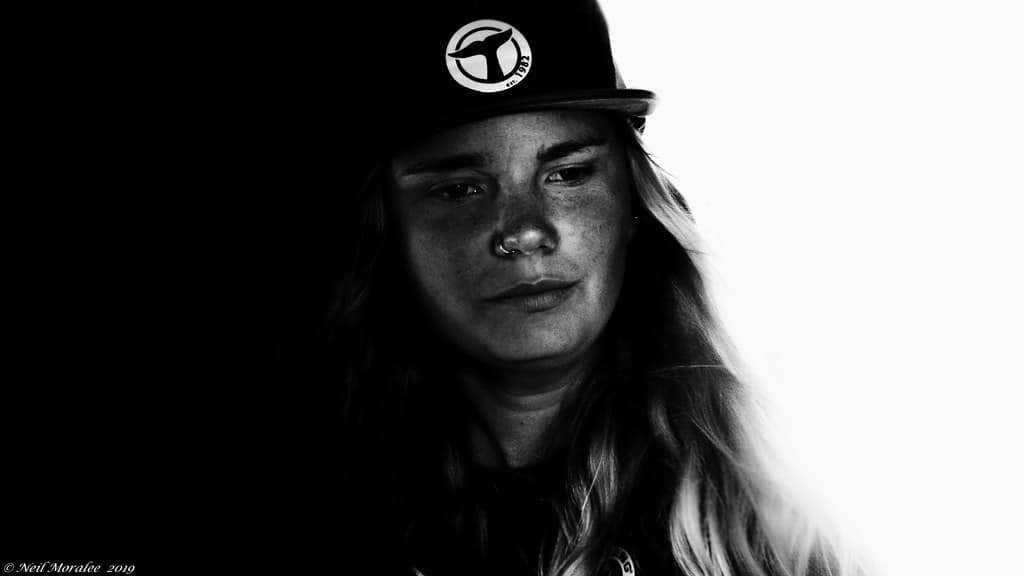
- Contrast: Contrast involves the interplay of light and dark areas in your photograph. Strong contrast can draw attention to a subject or create a dramatic atmosphere, while low contrast can produce a soft, dreamy effect.
The Storytelling Aspect
At its core, photography is a form of visual storytelling. Composition plays a pivotal role in conveying your narrative. Consider what you want to communicate through your photograph. Are you capturing a joyful moment, a serene landscape, or a dramatic event? Your composition should align with your storytelling goals.
Creating Balance and Harmony
A well-composed photograph achieves a balance between various visual elements. This balance can be symmetrical, where elements are evenly distributed, or asymmetrical, where different elements create equilibrium through contrast and tension. Achieving harmony in composition ensures that the viewer's eye flows smoothly through the image.
The Emotional Impact
Composition also influences the emotional impact of your photograph. The arrangement of elements can evoke feelings of joy, sadness, excitement, or tranquility. By carefully considering the composition, you can lead the viewer to experience the emotions you intend to convey.
Conclusion
Understanding photography composition is a foundational step in becoming a proficient photographer. It's not just about following rules; it's about using these principles as a toolkit to express your unique vision. In the chapters that follow, we will explore various composition techniques in depth, providing you with the knowledge and skills to create images that captivate, inspire, and resonate with your audience. So, let's dive into the world of photography composition and unlock the potential of your creative vision.
The Rule of Thirds
In the world of photography composition, the Rule of Thirds is a fundamental guideline that can significantly enhance the visual impact of your photographs. This concept is based on the idea of dividing your frame into a grid of nine equal parts by drawing two horizontal lines and two vertical lines, creating a tic-tac-toe-like structure. The essence of the Rule of Thirds is to place key elements of interest along these lines or at their intersections.
Balancing Your Composition
The Rule of Thirds is rooted in the principle of balance. Placing your subject or other vital elements along these imaginary lines helps distribute visual weight evenly throughout the frame. This balance creates a harmonious and pleasing visual experience for the viewer, as it avoids the monotony of centering everything in the frame.
Leading the Viewer's Eye
Another key advantage of the Rule of Thirds is that it naturally guides the viewer's eye through the photograph. When you position your subject or a focal point along one of these lines or intersections, it becomes a natural starting point for the viewer's gaze. From there, the viewer's eye tends to explore the rest of the image, resulting in a more engaging and dynamic viewing experience.
Creating a Sense of Space
By adhering to the Rule of Thirds, you can also convey a sense of space and context within your photograph. Placing your subject in one part of the frame while leaving the other areas relatively empty can provide a narrative context that allows the viewer to interpret and connect with the scene.
Landscape and Horizon Composition
In landscape photography, the Rule of Thirds is frequently applied to the placement of horizons. Rather than centering the horizon line, align it with either the upper or lower horizontal line. This decision can emphasize either the sky or the foreground, depending on your desired storytelling effect.

Portrait Photography
In portrait photography, the Rule of Thirds can be applied to the positioning of the subject's eyes or face. Placing the eyes along one of the horizontal lines allows the viewer to connect with the subject while still appreciating their surroundings.
Experimentation and Adaptation
While the Rule of Thirds is a valuable guideline, it's important to remember that photography is also an art form, and rules are meant to be broken or adapted as needed. Sometimes, breaking away from the rule can lead to innovative and compelling compositions. The key is to understand the rule thoroughly so that you can consciously choose when to apply or deviate from it for creative effect.
Case Study
Photographer: Sebastião Salgado
- Photo Series: Sebastião Salgado's "Workers" series features striking images of laborers from around the world. In many of his photographs, the Rule of Thirds is evident, with subjects like coal miners or coffee plantation workers placed along the intersections of the grid, emphasizing their importance and the harsh conditions they endure. This composition adds depth and impact to the documentary-style series.
Conclusion
Mastering the Rule of Thirds is an essential step in your journey to becoming a skilled photographer. By using this guideline effectively, you can create well-balanced, visually appealing, and emotionally resonant photographs that captivate your audience. However, always remember that photography composition is a versatile art, and while rules provide structure, your creativity knows no bounds. Experiment, adapt, and let your unique vision shine through your compositions.
Leading Lines
Leading lines are a powerful compositional tool in photography that can instantly draw viewers into your image and guide their gaze toward a specific point of interest or perspective within the frame. These lines can be actual physical lines, such as roads, fences, or architectural features, or they can be implied lines created by the arrangement of objects or the direction of a subject's gaze.
Creating Visual Flow
Leading lines serve as visual pathways, inviting the viewer to explore your photograph. When viewers follow these lines, they engage more deeply with the image and often discover layers of meaning or emotion. These lines can lead the viewer's eye from the foreground to the background or from one side of the frame to the other, creating a sense of movement and direction.

Enhancing Depth and Perspective
Incorporating leading lines into your composition can also add depth and perspective to your photographs. By converging lines toward a vanishing point, you create the illusion of depth, making your images feel three-dimensional. This can be particularly effective in landscape photography, where it can transform vast, open spaces into immersive and dynamic scenes.
Types of Leading Lines
- Horizontal Lines: Horizontal lines can convey a sense of stability and tranquility. They are often found in scenes with calm bodies of water, horizons, or flat landscapes.
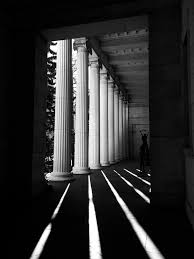
- Vertical Lines: Vertical lines can evoke a feeling of strength and structure. They are frequently seen in architectural photography, where tall buildings and columns dominate the frame.
- Diagonal Lines: Diagonal lines add energy and dynamic movement to your compositions. They are often used to create a sense of tension or drama.
- Curved Lines: Curved lines can be gentler and more organic, guiding the viewer's eye in a smooth, flowing manner. They are commonly found in natural settings like winding rivers, roads, or plant stems.
Utilizing Leading Lines
To effectively use leading lines in your photography:
- Identify the Lines: Train your eye to spot potential leading lines in your surroundings. These lines can be found almost anywhere, from urban environments to natural landscapes.
- Position Your Camera: Align your camera in such a way that the leading lines enter the frame at one edge and lead toward the point of interest or the main subject.
- Choose Your Focus: Consider whether you want the leading lines to guide the viewer to a specific subject or to become the subject themselves. Adjust your focus and depth of field accordingly.
- Experiment with Angles: Changing your perspective or shooting angle can drastically alter how leading lines are perceived within the frame. Don't be afraid to explore different viewpoints to find the most compelling composition.
Case Study
Photographer: Michael Kenna
- Photo Series: "Forms of Japan" - Kenna's black-and-white landscapes often feature prominent leading lines, such as paths, railroads, and roads, that guide the viewer's eye through the serene Japanese landscapes.
Conclusion
Leading lines are a valuable tool in photography composition that can transform ordinary scenes into captivating images. By incorporating these lines into your compositions, you not only enhance visual flow and depth but also engage viewers on a deeper level, inviting them to explore your photographic narrative. Keep your eyes open for opportunities to use leading lines in your photography, and remember that practice and experimentation will help you refine your skills and create visually stunning images.
Framing
Framing is a powerful photography composition technique that involves using elements within your photograph to encircle, highlight, or draw attention to your main subject. It creates a visual border within your image, adding depth and context while focusing the viewer's gaze on the subject. Framing can be achieved through both natural and artificial elements in your environment.
The Role of Framing
Framing serves multiple purposes in photography:
- Guiding the Viewer's Eye: A well-placed frame directs the viewer's attention towards the subject, ensuring they immediately notice what you want them to see.
- Creating Depth: Framing adds layers to your composition, providing a sense of depth by establishing foreground, middle ground, and background elements.
- Conveying Context: It helps viewers understand the environment in which the subject exists, providing context and telling a more complete story.


Types of Framing
- Natural Frames: These are elements in the environment that occur naturally and can be used to frame your subject. Examples include archways, trees, doorways, and rock formations.
- Artificial Frames: These are constructed elements, such as windows, fences, or tunnels, that can be used to frame your subject. They often offer clean, geometric lines.
- Human Elements: People can be used as framing elements. For instance, a person's arms forming a circle to frame a subject or their hands holding an object can create an intriguing frame.
- Foreground Elements: Placing an object or scene in the foreground of your image can create an effective frame that draws the viewer's eye toward the main subject in the background.
Considerations for Effective Framing
- Subject Placement: Position your subject within the frame thoughtfully. Ensure that it interacts harmoniously with the framing elements, creating balance and interest.
- Depth of Field: Experiment with depth of field to blur the framing elements slightly, drawing more attention to the subject. A shallow depth of field can create a pleasing separation between the subject and the frame.
- Lighting: Pay attention to how lighting interacts with your framing elements. Shadows and highlights can add texture and dimension to your composition.
- Color and Contrast: Ensure that the framing elements, subject, and background exhibit a contrast in color or tone. This contrast can make the subject pop within the frame.
Subtle vs. Prominent Framing
Framing can be subtle, with the frame elements blending naturally into the scene, or it can be more prominent, drawing immediate attention to the frame itself. The choice depends on your creative intent and the story you want to convey through your photograph.
Case Study
Example Photographer: Fan Ho
- Photo Series: "Hong Kong Yesterday" - Fan Ho's work frequently incorporates natural and architectural elements to frame his subjects, creating visually engaging compositions that capture the spirit of Hong Kong in the mid-20th century.
Conclusion
Framing is a versatile composition technique that adds depth, context, and visual interest to your photographs. It can transform mundane scenes into captivating images and bring a unique perspective to your storytelling. To master framing, practice observing your surroundings with a keen eye for potential frames, experiment with different framing elements, and consider how framing can enhance the narrative and emotional impact of your photography. Ultimately, framing is a creative tool that empowers you to craft more engaging and compelling visual stories.
Balance and Symmetry
Balance and symmetry in photography composition are principles that can help you create visually pleasing and harmonious images. These concepts play a crucial role in guiding the viewer's eye and conveying a sense of order and stability in your photographs. Understanding how to use balance and symmetry effectively will elevate your compositions to a new level of visual impact.
Balance in Composition
Balance refers to the distribution of visual weight in your photograph. When elements within your frame are harmoniously arranged, they create equilibrium, and the viewer's eye moves comfortably across the image. There are two main types of balance in composition:
- Symmetrical Balance: In symmetrical balance, elements on one side of the frame mirror those on the other. This type of balance creates a sense of stability and can be visually satisfying. Common examples include perfectly symmetrical buildings, reflections, or objects.
- Asymmetrical Balance: Asymmetrical balance involves distributing visual weight unevenly across the frame. It can create a sense of tension, dynamism, or movement. Asymmetry often feels more natural and is prevalent in photography, particularly in portraiture and landscapes.
Achieving Symmetry
Symmetry is a powerful composition tool that can add elegance and formality to your images. To achieve symmetry:
- Find a Center Point: Identify a central subject or axis around which you can build your symmetrical composition.
- Ensure Equivalence: Elements on one side of the frame should be roughly equal in visual weight and size to those on the other side.
- Maintain Balance: Symmetrical balance should extend to both horizontal and vertical axes, creating a mirror image effect.


Using Asymmetry
Asymmetry can be equally compelling, allowing for more dynamic and expressive compositions. To employ asymmetry:
- Consider Weight and Position: Balance the visual elements by positioning heavier or more attention-grabbing objects against lighter or less prominent ones.
- Experiment with Rule of Thirds: Placing the main subject or focal point off-center can create an asymmetrical balance that engages the viewer's interest.
- Use Diagonals and Lines: Incorporate diagonal lines or leading lines to connect asymmetrically placed elements and maintain visual coherence.
Balance and Emotional Impact
The choice between symmetrical and asymmetrical balance can influence the emotional impact of your photograph. Symmetry often conveys stability, calmness, and formality, while asymmetry can evoke energy, tension, or spontaneity. Your choice should align with the story and mood you wish to convey.
Case Study
Example Photographer: Andreas Gursky
- Photo Series: "99 Cent" - Gursky's large-scale photographs often exhibit a meticulous balance and symmetry, showcasing the grandeur of consumer culture and architecture in the contemporary world.
Conclusion
Balance and symmetry are essential components of photography composition that provide structure and visual appeal to your images. Whether you opt for perfect symmetry or embrace the dynamism of asymmetry, these principles allow you to guide the viewer's experience and convey your message effectively. As you continue to develop your photographic skills, practice using both balance and symmetry in your compositions, experimenting with different subjects and genres to master the art of visual equilibrium in your photography.
Depth and Layers
Depth and layers in photography composition are techniques that allow you to create visually compelling and immersive images. By incorporating elements that span from the foreground to the background, you provide viewers with a sense of depth, dimension, and context within your photographs. This technique is especially crucial for storytelling and capturing the viewer's attention.
Creating Depth
Depth in photography is about making your two-dimensional image feel three-dimensional. It gives the illusion that you can move through the scene, exploring it from front to back. Here's how you can create depth in your compositions:
- Foreground Elements: Place objects, subjects, or details in the foreground of your image. These elements serve as a point of entry for the viewer, drawing them into the scene.
- Middle Ground: The middle ground connects the foreground to the background and often contains additional subjects or elements that contribute to the story you're telling.
- Background: The background provides context and sets the scene. It can be a distant landscape, a cityscape, or any environment that complements your subject.
- Overlapping Elements: Overlapping objects or subjects in your frame can convey depth. When one object partially obscures another, it creates a sense of spatial relationships.
Using Layers
Layers add complexity and richness to your photographs, offering viewers multiple points of interest to explore. Here's how you can incorporate layers into your compositions:
- Visual Hierarchy: Consider the hierarchy of your layers. What should viewers notice first, second, and so on? Arrange your elements to guide their attention accordingly.
- Texture and Detail: Vary the textures and details in each layer to create contrast and visual interest. For example, a detailed foreground can contrast with a smooth, blurred background.
- Color and Light: Use differences in color and lighting to separate and define each layer. Stronger lighting or brighter colors can emphasize a particular layer.
- Framing with Layers: Layers can also be used to frame your subject. For instance, a row of trees in the foreground and background can create a frame around a central subject.
Storytelling with Depth and Layers
Depth and layers are powerful tools for storytelling in photography. They allow you to convey context, relationships, and narratives within a single frame. By strategically placing elements in your composition, you can lead viewers on a visual journey through your photograph, helping them connect with the scene on a deeper level.
Case Study
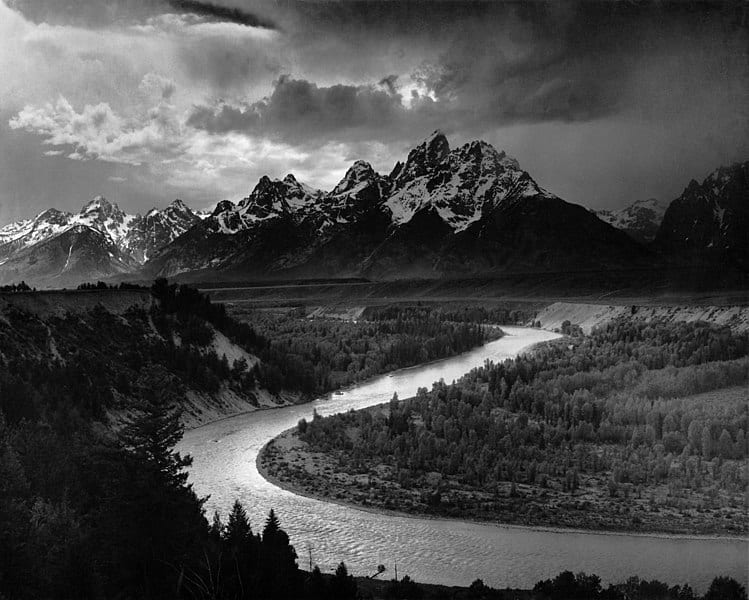
Example Photographer: Ansel Adams
- Photo Series: "Majestic Landscapes of the American West" - Ansel Adams' iconic landscape photography masterfully employs depth and layers to convey the vastness and grandeur of America's national parks.
Conclusion
Mastering the art of creating depth and layers in your photography composition opens up new possibilities for capturing the essence of a scene. Whether you're photographing landscapes, portraits, or street scenes, understanding how to use foreground, middle ground, and background elements will enrich your images and engage your viewers. As you practice and experiment with these techniques, you'll develop a deeper understanding of how to create compelling, multi-dimensional photographs that tell powerful stories and captivate your audience.
Patterns and Repetition
Patterns and repetition are dynamic composition tools in photography that can transform ordinary scenes into captivating visual stories. These elements add rhythm, structure, and harmony to your images, drawing viewers in with their inherent sense of order and predictability.
Understanding Patterns
Patterns are recurring elements within a frame that create a sense of consistency or regularity. They can be found in both natural and artificial subjects, from the symmetry of a honeycomb to the repetitive lines of a cityscape. Recognizing patterns is the first step in incorporating them effectively into your compositions.
The Power of Repetition
Repetition is a fundamental aspect of patterns. It reinforces the visual impact and can emphasize the theme or message of your photograph. Repetition can be found in shapes, colors, textures, or objects, and it provides a sense of rhythm and familiarity for the viewer.
Utilizing Patterns and Repetition
- Observation: Start by observing your surroundings with a keen eye for patterns and repetitions. Look for elements that naturally repeat, such as architectural details, nature's designs, or urban scenes.
- Composition: Once you've identified a pattern, consider how to incorporate it into your composition. You can choose to emphasize the pattern by filling the frame with it or use it as a complementary element to your main subject.
- Framing: Patterns can also serve as frames or borders around your subject, adding visual interest and drawing attention to the focal point.
- Varying Scale: Experiment with varying the scale of the repeating elements. This can create depth and visual contrast within the pattern, adding layers of interest to your composition.
- Breaking the Pattern: Sometimes, breaking the pattern can create a striking effect. Inserting an element that deviates from the repetition can draw attention and add intrigue to your image.
Patterns in Different Genres
- Nature Photography: Natural patterns are abundant in the world around us, from the ripples in water to the veins on a leaf. Capturing these patterns can reveal the beauty and symmetry in the natural world.
- Architecture: Architectural details often exhibit geometric patterns and repetitions. Focus on capturing the structural elements of buildings or the intricate designs within them.
- Street Photography: Urban environments are rich with opportunities for pattern and repetition. Look for repeated shapes in street scenes, like rows of windows, streetlights, or pedestrians.
- Abstract Photography: Patterns can be the main subject in abstract photography. Experiment with close-ups of everyday objects to reveal unseen patterns and textures.
Case Study
Example Photographer: Elliott Erwitt
- Photo Series: "Dog People" - Erwitt's humorous series captures the quirky patterns and repetitions in everyday life, often featuring dogs and their owners in amusing scenarios.
Conclusion
Patterns and repetition are versatile composition techniques that can add a layer of depth, rhythm, and visual interest to your photographs. By recognizing patterns in your environment and incorporating them thoughtfully into your compositions, you can create visually compelling images that resonate with viewers. Whether you're capturing the beauty of nature, the symmetry of architecture, or the hustle and bustle of the city, patterns and repetition offer endless creative possibilities to enhance your photography. Practice and experimentation will help you refine your skills and develop a unique visual style that incorporates these powerful compositional elements.
Color and Contrast
Color and contrast are essential elements in photography composition that profoundly influence the mood, impact, and storytelling potential of your images. Understanding how to effectively work with color and contrast can elevate your photographs from ordinary to extraordinary.
The Role of Color
Color is a potent visual element that can evoke emotions, convey meaning, and set the tone for your photographs. Here's how you can harness the power of color:
- Color Temperature: Recognize the difference between warm colors (reds, oranges, yellows) and cool colors (blues, greens, purples). Warm colors often create a sense of coziness, while cool colors can convey tranquility or coldness.
- Color Harmony: Complementary colors (opposite on the color wheel) can create striking contrast, while analogous colors (adjacent on the color wheel) can produce a harmonious and serene effect. Experiment with both to achieve your desired mood.
- Color as a Focal Point: Use color to draw attention to your subject or a specific area within your frame. A pop of color against a neutral background can be particularly attention-grabbing.
- Cultural Significance: Be aware of the cultural and psychological associations of colors. For example, red is often associated with passion or danger, while blue is linked to calmness and trust.


The Role of Contrast
Contrast involves the variation in brightness, tone, or color within your photograph. It's a crucial element for creating visual interest and guiding the viewer's eye. There are several types of contrast:
- Tonal Contrast: This relates to the difference between light and dark areas in your image. High tonal contrast can create drama, while low tonal contrast can convey softness and subtlety.
- Color Contrast: Contrast between colors can be used to make elements stand out. Complementary colors, like red and green or blue and orange, create strong color contrast.
- Texture Contrast: Different textures within an image can add depth and intrigue. Combining smooth and rough textures can enhance contrast and visual appeal.
- Spatial Contrast: Placing elements with varying sizes or distances from the camera can create spatial contrast. For example, a small subject against a vast landscape can convey a sense of scale and depth.
Using Color and Contrast for Storytelling
The choice of color and contrast can significantly impact the story you're trying to tell with your photographs. Consider how these elements can support your narrative:
- Emotion: Use warm, vibrant colors and high contrast for scenes of excitement or passion. For calm or reflective moments, opt for cooler tones and lower contrast.
- Narrative Focus: Adjust color and contrast to emphasize your subject or convey the mood of a specific scene. Subtle changes in color grading during post-processing can be effective for storytelling.
- Subject Isolation: High contrast can isolate your subject from the background, making it the center of attention. This technique is often used in portrait photography.
Case Study
Example Photographer: Saul Leiter
- Photo Series: "Early Color" - Leiter's pioneering work in color photography beautifully demonstrates his use of color and contrast to create poetic and evocative urban scenes.
Conclusion
Color and contrast are powerful tools in the photographer's arsenal, allowing you to control the visual impact and emotional resonance of your images. By understanding the principles of color theory and contrast and practicing their application in your photography, you can create visually compelling compositions that resonate with viewers on a deep and emotional level. Whether you're working with the vibrant colors of a bustling street market or the subtle contrasts of a misty forest, color and contrast are essential elements that can help you tell your photographic stories with impact and artistry.
The Golden Ratio
The Golden Ratio, often referred to as the Divine Proportion or the Fibonacci Spiral, is a mathematical concept that has been employed in art, architecture, and photography for centuries. It's a composition tool that can add a sense of balance, harmony, and aesthetic appeal to your photographs. Understanding how to use the Golden Ratio effectively can elevate your compositions to a new level of visual sophistication.
What Is the Golden Ratio?
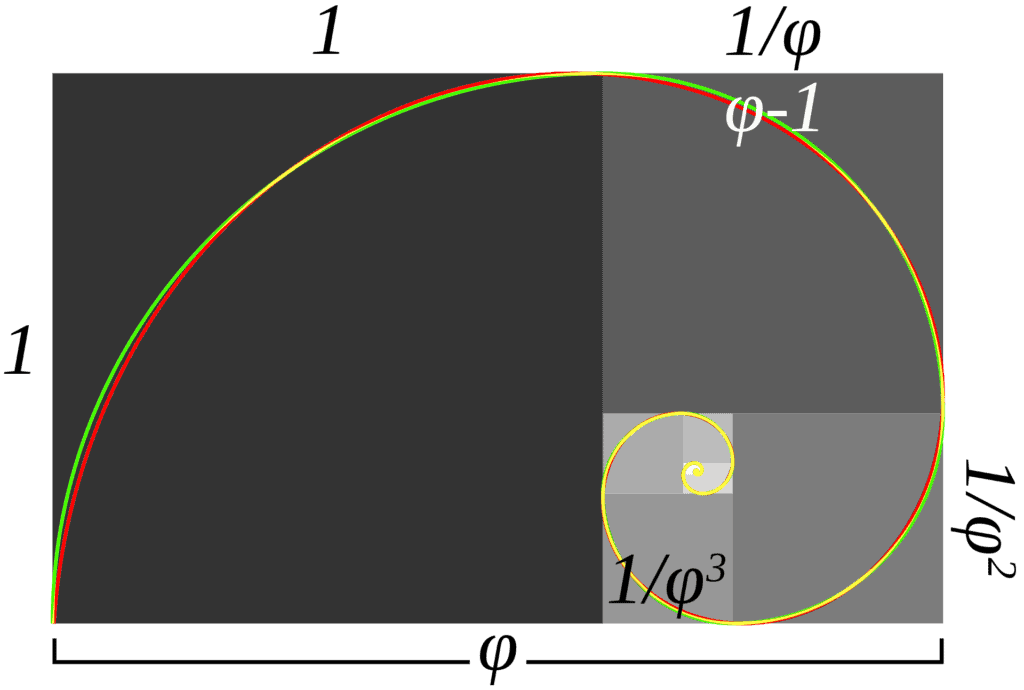
The Golden Ratio is a mathematical constant approximately equal to 1.61803398875. It is derived from the Fibonacci sequence, a series of numbers in which each number is the sum of the two preceding ones. This sequence often appears in nature, from the arrangement of leaves on a stem to the spiral pattern of a seashell.
The Golden Ratio is represented visually by a spiral and a set of rectangles, each with a side length in proportion to the preceding one by the Golden Ratio. When applied to photography, this ratio can help you determine where to place key elements for maximum visual impact.
Using the Golden Ratio in Photography
- The Spiral: The Golden Ratio spiral can be used to guide the viewer's eye through the photograph. You can position your main subject or focal point along the curve of the spiral, leading the viewer on a visually pleasing journey through the image.
- The Rectangles: The Golden Ratio rectangles can also serve as guides for placing elements within your frame. By dividing your frame into these rectangles, you can position key elements along the lines or intersections, creating a balanced and aesthetically pleasing composition.
- Rule of Thirds vs. Golden Ratio: While both the Rule of Thirds and the Golden Ratio can be effective composition techniques, the Golden Ratio often provides a more dynamic and visually engaging result. It's a bit more complex to apply but can yield striking compositions that draw the viewer in.
Examples of Golden Ratio in Photography
- Portrait Photography: Positioning a subject's eyes at the intersection points of the Golden Ratio rectangles can create a visually appealing and balanced portrait.
- Landscape Photography: Placing a prominent element, like a tree or a mountain peak, along the Golden Ratio spiral can draw the viewer's eye into the landscape, creating a sense of depth and exploration.
- Still Life Photography: When arranging objects in a still life composition, consider their placement based on the Golden Ratio to achieve a harmonious and aesthetically pleasing arrangement.
Case Study
Example Photographer: Irving Penn
Conclusion
The Golden Ratio is a composition tool that can add elegance, balance, and aesthetic appeal to your photographs. While it may not be the only technique you use, it offers a unique and visually captivating way to guide the viewer's eye and create harmonious compositions. As you develop your photographic skills, experiment with incorporating the Golden Ratio into your compositions to create images that are not only visually appealing but also resonate with a timeless sense of beauty and balance. Remember that creativity and artistry often involve breaking rules, so use the Golden Ratio as a guideline to enhance your compositions, but don't be afraid to explore new and innovative ways to tell your photographic stories.
Negative Space
egative space is a powerful and often overlooked element in photography composition. It is the area around your main subject, and how you use it can greatly impact the mood, focus, and storytelling potential of your images. Understanding how to leverage negative space effectively can elevate your photography to a more profound and visually engaging level.
The Role of Negative Space
Negative space, also known as white space or empty space, is the area that surrounds your subject. It provides breathing room, balance, and context within your composition. Here's how it influences your photographs:
- Subject Emphasis: Negative space helps draw attention to your subject by isolating it and allowing it to stand out against a clean or uncluttered background.
- Mood and Emotion: The amount and use of negative space can influence the emotional impact of your photograph. It can convey a sense of solitude, tranquility, or isolation, depending on how it's applied.
- Context and Storytelling: Negative space can provide context to your subject by showing where it exists within its environment. It can also tell a story by leaving room for the viewer's imagination to fill in the details.
Utilizing Negative Space
- Minimalism: Negative space is often associated with minimalist photography, where simplicity and elegance are key. Reducing clutter and distractions by focusing on the subject within a sea of emptiness can create powerful visual impact.
- Framing: Negative space can be used as a frame or border around your subject, drawing the viewer's eye inward. This technique often adds depth and dimension to your images.
- Contrast: Negative space can enhance contrast, making your subject or elements within the frame more pronounced. The stark difference between the subject and the surrounding emptiness can be visually striking.
- Leading Lines: Negative space can also be employed to create leading lines or pathways that guide the viewer's eye toward the subject or a specific area of interest.
Balancing Negative Space
Achieving the right balance between your subject and negative space is crucial. Too much negative space can overwhelm the subject, while too little can clutter the composition. Consider the following:
- Rule of Thirds: Position your subject within one of the intersections of the Rule of Thirds grid, leaving ample negative space on one or more sides for balance.
- Subject Placement: Experiment with different placements of your subject within the frame to see how it interacts with the surrounding negative space. This can drastically alter the composition's mood and impact.
- Perspective and Angle: Adjust your shooting angle and perspective to control the amount of negative space in your frame. Sometimes, changing your position can lead to more engaging compositions.
Case Study
Example Photographer: Daido Moriyama
- Photo Series: "Farewell Photography" - Moriyama's gritty and abstract street photography often plays with negative space, creating a sense of mystery and intrigue in urban environments.
Conclusion
Negative space is a versatile and underappreciated element in photography composition. By thoughtfully incorporating it into your images, you can create photographs that are not only visually pleasing but also emotionally resonant. Whether you're aiming for minimalist elegance, emphasizing your subject, or telling a compelling story, negative space is a powerful tool at your disposal. As you refine your photography skills, experiment with negative space to discover new ways to engage and captivate your audience, making your images more compelling and memorable.
Perspective and Point of View
Perspective and point of view are fundamental elements in photography composition that enable you to create unique and engaging images. These concepts dictate how you see and capture the world through your camera lens, and they greatly influence the visual impact and storytelling potential of your photographs.
Understanding Perspective
Perspective refers to the way objects appear in relation to each other and their surroundings when viewed from a specific vantage point. It's essentially the angle or viewpoint from which you capture your subject. Here are some key aspects of perspective:
- Changing Perception: Altering your perspective can radically change the way your subject is perceived. Objects can appear larger or smaller, more imposing or less significant, depending on your point of view.
- Foreground and Background: Perspective influences how you incorporate foreground and background elements into your composition. It can create depth and lead the viewer's eye through the image.
- Leading Lines: Perspective can enhance the effect of leading lines, emphasizing their convergence or divergence and guiding the viewer's gaze accordingly.
Experimenting with Perspective
To leverage perspective effectively, experiment with different angles and viewpoints:
- Eye Level: Shooting from your own eye level provides a natural and relatable perspective. It's often used for portraits and scenes where you want to capture the subject as you see it in everyday life.
- Low Angle: Shooting from a low angle, near the ground, can make your subject appear more imposing and powerful. This perspective is often used in sports or action photography.
- High Angle: Shooting from a high angle, looking down on your subject, can create a sense of vulnerability or insignificance. It's commonly used for overhead shots or to capture a subject in its environment.
- Wide Angle: Wide-angle lenses exaggerate perspective and create a sense of depth. They're great for landscapes and architecture, as they can capture more of the scene and emphasize the scale of objects.
- Telephoto Lens: Telephoto lenses compress perspective, making distant objects appear closer to the subject. They're ideal for isolating subjects from their surroundings.
Point of View and Composition
Point of view (POV) is closely related to perspective and refers to the specific location or angle from which you're shooting. It plays a crucial role in composition:
- Framing and Emphasis: Your choice of point of view determines what elements are included or excluded from the frame. It allows you to frame your subject against specific backgrounds or foregrounds for emphasis.
- Storytelling: POV can help you tell a story or convey a specific message. For example, shooting from a child's eye level can evoke a sense of innocence or wonder.
- Narrative Perspective: In storytelling photography, consider whose perspective you're capturing. Is it the subject's, the photographer's, or an observer's viewpoint? This decision can shape the narrative.
Case Study
Example Photographer: Annie Leibovitz
- Photo Series: "Celebrity Portraits" - Leibovitz's celebrity portraits showcase her dynamic use of perspective and point of view to capture the personalities and stories of her subjects.
Conclusion
Perspective and point of view are integral to the art of photography. They offer you creative control over how you present your subjects, scenes, and stories to your audience. By exploring different perspectives and viewpoints, you can craft visually compelling and emotionally resonant photographs that engage and captivate viewers. Keep experimenting and pushing the boundaries of perspective in your photography to discover new ways to convey your unique vision and message.
Rule Breaking
In photography composition, as in any art form, rules and guidelines provide structure and a foundation for creative expression. However, there are times when breaking these rules can lead to innovative, striking, and emotionally resonant images. Understanding when and how to break the rules is a skill that can set your photography apart and allow you to push the boundaries of creativity.
The Importance of Knowing the Rules
Before you can effectively break the rules, it's crucial to understand them thoroughly. Photography rules, such as the Rule of Thirds, leading lines, and symmetry, have been developed over time to help photographers create balanced and visually pleasing compositions. These guidelines can be especially helpful for beginners as they provide a solid framework for creating strong images.
When to Break the Rules
- Creative Expression: Breaking the rules can be a deliberate choice to convey a specific emotion or message. For example, intentionally placing the main subject in the center of the frame can create a sense of isolation or significance.
- Highlighting Uniqueness: Breaking the rules can make your photographs stand out. Unconventional compositions can capture the viewer's attention and make them see a familiar subject in a new light.
- Storytelling: Certain narratives may call for breaking the rules. For instance, a chaotic, off-balance composition can convey the feeling of disorder or conflict in a scene.
Common Rule-Breaking Techniques
- Centering the Subject: Placing the subject in the center of the frame, contrary to the Rule of Thirds, can create a sense of symmetry and stability. This approach is effective when you want to emphasize the subject's importance.
- Intentional Blur: While sharp focus is often preferred, using intentional blur through techniques like panning or intentional camera movement can convey motion, energy, or a dreamlike quality.
- Overexposure or Underexposure: Deliberately overexposing or underexposing an image can create mood and atmosphere. High-key and low-key photography are examples of such creative choices.
- Contradictory Framing: Breaking the framing rules can add visual interest. You might place elements partially outside the frame or incorporate foreground elements that partially obscure the subject.
Breaking the Rules with Purpose
The key to successful rule-breaking in photography is doing so with intent and purpose. Instead of haphazardly ignoring guidelines, consider why you want to break a particular rule and what effect it will have on the viewer. Ask yourself:
- What emotion or message do I want to convey?
- How does breaking this rule enhance the composition?
- Does it contribute to the narrative or the overall impact of the photograph?
Case Study
Example Photographer: Diane Arbus
- Photo Series: "Freaks" - Arbus's unconventional and thought-provoking portraits often break the rules of traditional portrait photography, challenging societal norms and perceptions.
Conclusion
While photography rules and guidelines are valuable tools for creating strong compositions, they are not rigid laws. Breaking the rules can open the door to a world of creative possibilities. However, effective rule-breaking requires a deep understanding of the rules themselves and a clear purpose behind your choices. Embrace experimentation, take risks, and be open to pushing the boundaries of conventional photography to develop your unique style and storytelling abilities. Remember that the best photographers are often those who know when to follow the rules and when to break them for the sake of creativity and artistic expression.
Post-Processing and Composition
Post-processing is a crucial step in photography that allows you to refine and enhance your compositions, bringing out the full potential of your images. While composition primarily involves capturing the scene in-camera, post-processing tools and techniques can further elevate your photographs by fine-tuning elements like contrast, color, and clarity. In this chapter, we'll explore how post-processing can complement and enhance your composition skills.
Post-Processing as a Creative Tool
Post-processing is not about altering reality but about enhancing it. When used thoughtfully, it can help you achieve the following:
- Balancing Exposure: Correct exposure issues and fine-tune the tonal range to ensure that your subject stands out and the overall image is well-balanced.
- Color Grading: Adjust the color balance, saturation, and vibrance to enhance or change the mood of your photograph. Post-processing allows you to create a more dramatic or harmonious color palette.
- Contrast and Clarity: Enhance contrast to make your subject pop or soften contrast for a dreamy, ethereal effect. Adjusting clarity can emphasize or minimize fine details in your composition.
- Cropping and Framing: Reframe your image during post-processing to improve composition. Cropping can help you eliminate distractions or align your subject with compositional guidelines.
Enhancing Composition in Post-Processing
- Straightening and Aligning: Correct crooked horizons or lines that weren't perfectly horizontal or vertical during shooting. This ensures that your composition is visually pleasing and well-balanced.
- Recomposing: In some cases, you might find that a different crop or framing works better for your composition after reviewing your shots. Post-processing allows you to make these adjustments.
- Selective Adjustments: Use tools like masks and brushes to apply adjustments selectively to specific areas of your image. This can help draw attention to your subject or create visual depth.
- Dodge and Burn: Dodge (lighten) and burn (darken) specific areas to bring out details or add dimension to your composition. This can be especially effective in portraiture and landscape photography.
Preserving Authenticity
While post-processing can enhance your compositions, it's essential to strike a balance between creative editing and preserving the authenticity of your photographs. Over-processing can lead to unnatural or unrealistic results. Remember that post-processing should enhance your vision, not replace it.
Consistency in Editing
Maintaining a consistent editing style can help establish your photographic identity. When viewers recognize your signature style, it can set your work apart and make it more memorable. Experiment with different post-processing techniques to develop your unique editing approach.
Case Study
Example Photographer: Peter Lik
- Photo Series: "Spirit of America" - Lik's landscape photography is known for its post-processing enhancements, creating vivid and surreal compositions that evoke a sense of wonder and awe.
Conclusion
Post-processing is a valuable extension of your photography journey. It complements your composition skills by providing a platform for refining and enhancing your images. Embrace the creative possibilities it offers while maintaining authenticity and consistency in your work. Remember that post-processing is a skill that develops over time with practice and experimentation, so don't hesitate to explore different editing techniques to discover what works best for your style and vision as a photographer.
Photography Composition Techniques Summary
Here is a quick reference to key photography composition techniques that can enhance your visual storytelling:
| Technique | Description |
|---|---|
| Rule of Thirds | Divide the frame into a 3x3 grid and place key elements along the lines. |
| Leading Lines | Use natural lines to direct the viewer’s gaze towards the subject. |
| Framing | Use elements within the scene to create a frame around the subject. |
| Balance & Symmetry | Balance elements on either side of the frame for harmony. |
| Depth & Layers | Add depth by including foreground, middle ground, and background elements. |
| Patterns & Repetition | Use repeated elements to create visual interest. |
| Color & Contrast | Utilize color and contrast to make the subject stand out. |
| Breaking the Rules | Experiment by breaking traditional composition rules for creative effect. |
Conclusion: Photography Composition, Practice Makes Perfect
In the world of photography composition, as in any creative endeavor, practice is the key to improvement and mastery. Throughout this comprehensive guide, we've explored the fundamental principles, techniques, and creative tools that can help you craft compelling and visually captivating images. Now, as we conclude our journey, it's essential to emphasize the significance of practice in honing your composition skills.
The Journey of Mastery
Becoming a skilled and creative photographer is a journey rather than a destination. Here are some key takeaways to consider as you continue on your path to photographic mastery:
- Study and Understanding: Understanding the principles of composition, such as the Rule of Thirds, leading lines, and balance, is essential. Continue to learn and deepen your knowledge of these concepts.
- Observation: Train your eye to see the world differently. Be mindful of your surroundings, noticing patterns, textures, shapes, and lighting. The more you observe, the more you'll discover unique compositions.
- Experimentation: Don't be afraid to experiment and push your creative boundaries. Try new techniques, angles, and perspectives. Not every experiment will yield a masterpiece, but each one contributes to your growth as a photographer.
- Feedback and Critique: Seek feedback and critique from fellow photographers, mentors, or online photography communities. Constructive criticism can offer fresh perspectives and help you identify areas for improvement.
- Develop Your Style: While it's essential to learn from others, strive to develop your unique photographic style. Your style is an expression of your vision and creativity, setting your work apart from the rest.
- Consistency: Regular practice is key to improving your skills and maintaining your photographic momentum. Dedicate time to photography, even when you're not feeling particularly inspired.
- Critique Your Work: Review your own work critically. Analyze what works and what doesn't in your compositions. This self-awareness will guide your progress.
- Capture Emotion and Story: Remember that photography is not just about aesthetics but also about storytelling and emotional connection. Strive to capture moments and stories that resonate with your viewers.
- Continuous Learning: Photography is a constantly evolving art form. Keep up with new technologies, techniques, and trends to stay fresh and innovative.
Embrace the Journey
The path to becoming a skilled photographer is filled with challenges and triumphs. It's a journey that offers continuous growth, self-discovery, and the joy of capturing the world through your unique perspective. Embrace the process, celebrate your successes, learn from your failures, and remember that every photograph you take is a step toward mastery.
In closing, remember that practice makes perfect, but it's also the imperfections and the lessons learned along the way that make your photographic journey so rewarding. Keep your camera in hand, keep your eyes open, and keep creating images that speak to your heart and connect with your audience. Your unique voice as a photographer will continue to evolve and shine through in your compositions as you dedicate yourself to the art and craft of photography.
Composition in Photography: Curated Videos
Composition in Photography: Curated Lectures in PDF
https://gewa.gsfc.nasa.gov/clubs/photo/Documents/presentations/BeginnersClass3.pdf
https://graphics.stanford.edu/courses/cs178-09/lectures/composition-07may09.pdf
http://graphics.cs.cmu.edu/courses/15-463/2011_fall/Lectures/postmodern.pdf
Good article.