Liquid Emulsion Magic: Printing Photos on Anything!
Imagine a world where your cherished photos escape the confines of frames and screens, finding a home on your coffee mug, skateboard, or even an old denim jacket. Welcome to the enchanting world of liquid emulsion! This versatile medium allows you to print photos on virtually anything, turning everyday objects into extraordinary works of art. As photographers increasingly explore alternative photography processes, liquid emulsion stands out as one of the most accessible and creatively rewarding techniques. Dive into this captivating process and unleash your inner artist to create personalized photo masterpieces that will leave everyone in awe.
What is Liquid Emulsion and How Does It Work?
Liquid emulsion is a light-sensitive photographic coating that can be applied to virtually any porous or textured surface. Unlike traditional photographic paper, which comes pre-coated and ready to use, liquid emulsion gives you complete freedom to choose your canvas. The emulsion typically contains silver halide crystals suspended in gelatin—the same fundamental chemistry that powered analog photography for over a century.
When you brush this magical substance onto a surface and allow it to dry in darkness, you’re essentially creating your own custom photographic paper. The surface becomes light-sensitive and ready to capture an image through contact printing with a negative. This process bridges the gap between traditional darkroom techniques and contemporary mixed-media art, offering photographers a unique way to expand their creative practice beyond conventional boundaries.
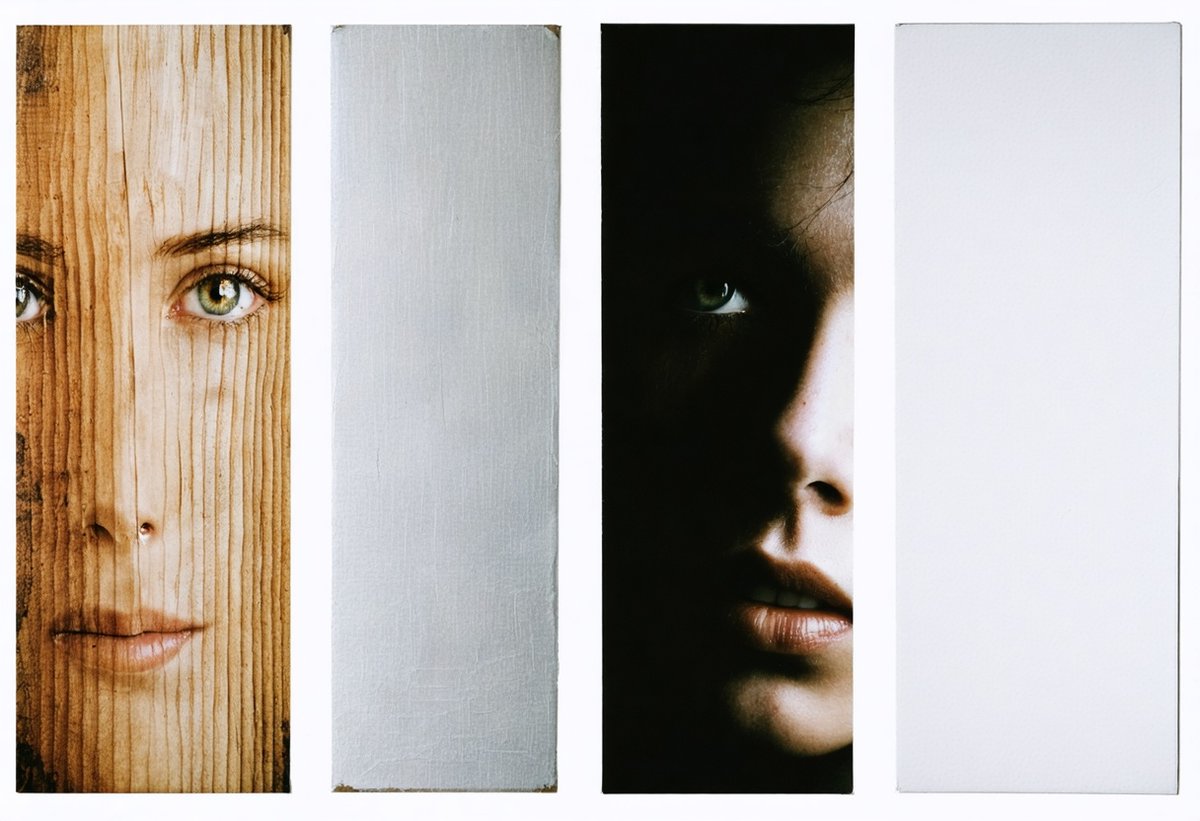
The beauty of liquid emulsion lies in its unpredictability and organic quality. Unlike the perfect, uniform surface of photographic paper, emulsion applied to textured materials creates unique interactions between the image and substrate. Wood grain becomes part of the composition, fabric weave adds texture to portraits, and the irregular absorption of emulsion on different materials produces one-of-a-kind results that can never be exactly replicated.
Unleash Your Inner Artist with Liquid Emulsion
Liquid emulsion is the magical ingredient that transforms ordinary surfaces into photographic canvases. This light-sensitive concoction can be brushed onto a variety of materials—from wood and glass to fabric and metal—making it possible to develop photos directly on them. The beauty of liquid emulsion lies in its versatility and the endless creative possibilities it offers. Whether you’re an experienced photographer or a DIY enthusiast, experimenting with liquid emulsion opens up a whole new world of artistic expression.
Imagine decorating your living space with unique pieces that tell your stories in the most personal way. With liquid emulsion, you don’t need to be a professional artist to create stunning visuals. The process encourages experimentation, allowing you to explore textures, colors, and surfaces that traditional photo printing methods simply can’t achieve. So, roll up your sleeves, grab a brush, and let your creativity flow!
The Creative Advantages of Liquid Emulsion
What sets liquid emulsion apart from other photographic processes is its inherent imperfection and artistic character. The technique naturally produces soft edges, uneven coating patterns, and subtle variations in tone that give images a dreamlike, nostalgic quality. These characteristics make liquid emulsion particularly well-suited for creating artwork that emphasizes mood and emotion over technical precision.
Photographers working with liquid emulsion often discover that the “mistakes” and unexpected results become the most compelling aspects of their work. A brush stroke that’s slightly too heavy creates an area of deeper tonality; an air bubble in the emulsion leaves an intriguing void in the image; the natural texture of wood or fabric interacts with the photographic image to create layers of visual interest. This unpredictability aligns perfectly with contemporary approaches to image-making that embrace experimentation and chance, similar to techniques explored in chemigrams and other experimental darkroom processes.
Transform Everyday Objects into Photo Masterpieces
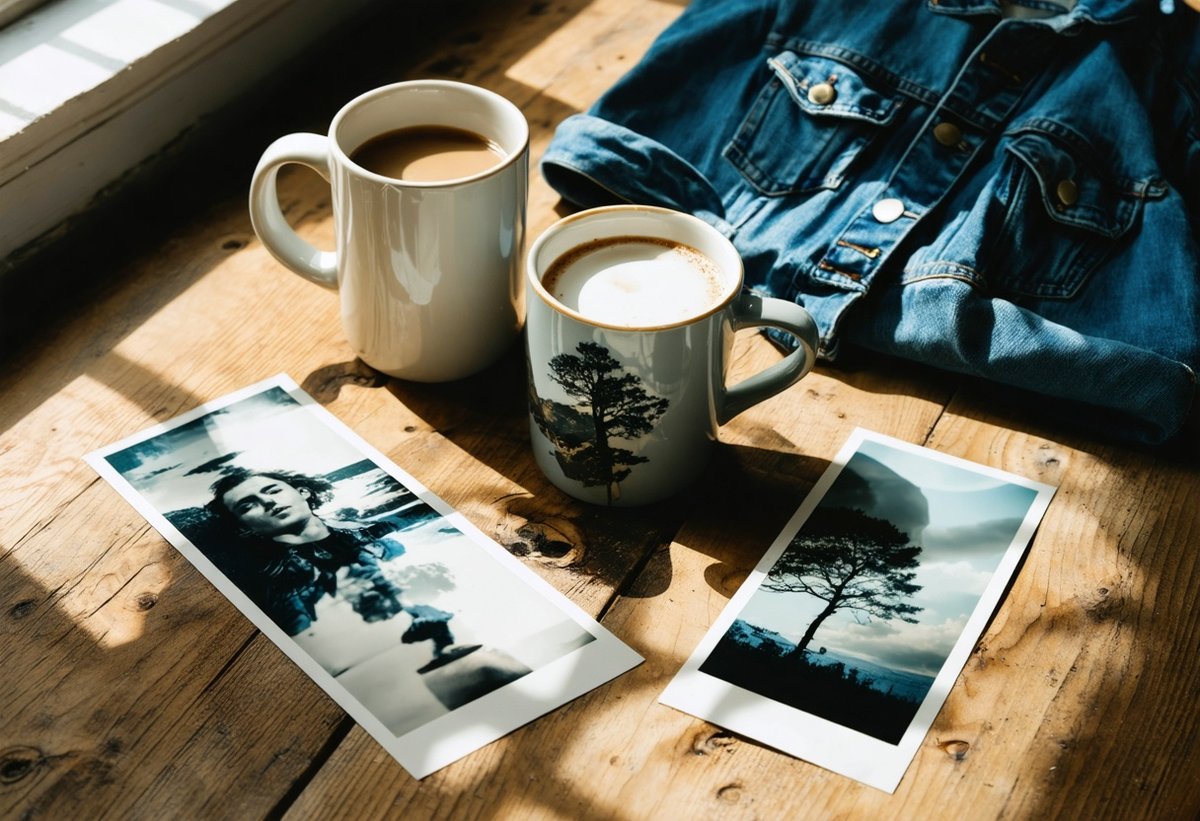
One of the most thrilling aspects of using liquid emulsion is its ability to turn mundane items into captivating art pieces. Consider your morning coffee ritual—now picture sipping from a mug adorned with a cherished photo of a loved one or a breathtaking landscape. With liquid emulsion, every sip becomes a special moment, a connection to memories and emotions captured in time.
But why stop at mugs? Your creativity knows no bounds. Skateboards can become rolling art galleries, jackets can tell a story with every stitch, and even old thrift store finds can be revitalized with a personal touch. The transformative power of liquid emulsion means that no object is too ordinary to be overlooked. Each item you choose to embellish becomes a unique canvas, a reflection of your personality and artistic vision.
Popular Surfaces for Liquid Emulsion Printing
Wood: One of the most popular substrates for liquid emulsion, wood provides a warm, organic foundation that complements photographic images beautifully. The grain pattern becomes an integral part of the image, adding depth and character. Birch plywood, reclaimed barn wood, and smooth maple all produce distinctly different results. Sand the wood lightly before application to ensure proper adhesion, and consider the wood’s natural color—lighter woods work best for maintaining image contrast.
Fabric and Canvas: Textile surfaces create soft, painterly effects perfect for portrait work and artistic interpretations. Cotton canvas, linen, silk, and even denim can be coated with emulsion. The fabric’s weave becomes visible in the final image, creating a tactile quality that invites viewers to look closer. Pre-washing fabric removes sizing and improves emulsion absorption. Stretched canvas allows you to create gallery-ready artwork, while fabric pieces can be sewn into quilts, pillows, or wearable art.
Glass and Ceramics: These non-porous surfaces require special preparation but yield stunning results. The emulsion sits on top of the surface rather than being absorbed, creating a delicate layer that can be quite fragile. Glass pieces become luminous when backlit, while ceramic mugs, plates, and tiles transform functional objects into personalized keepsakes. A light sanding with fine-grit sandpaper helps the emulsion adhere better to these smooth surfaces.
Metal: Aluminum, copper, and steel provide unique substrates that reference early photographic processes like tintypes. The cool, industrial quality of metal creates striking contrast with the organic, hand-applied nature of the emulsion. Lightly sand and clean metal surfaces thoroughly with rubbing alcohol before coating to ensure proper adhesion and prevent oxidation from affecting your image.
Paper and Cardboard: While traditional photo paper already exists, coating watercolor paper, handmade paper, or textured cardstock with emulsion allows you to create images with unique surface qualities. The absorbency of paper makes it forgiving for beginners, though very thick applications may crack when dry. Vintage book pages, sheet music, and maps create intriguing layered effects when used as substrates.
Essential Materials and Equipment
Before diving into your first liquid emulsion project, you’ll need to gather some essential materials. The good news is that the barrier to entry is relatively low compared to setting up a full darkroom. Here’s what you’ll need to get started:
Liquid Light Emulsion: The most common brand is Rockland Liquid Light, available from photography suppliers and online retailers. Store it in the refrigerator when not in use, but warm it to room temperature before application for easier brushing. A small bottle goes a long way—typically enough for dozens of projects.
Photographic Negatives: You’ll need negatives that match the size of your project. These can be traditional film negatives or digital negatives printed on transparency film using an inkjet printer. Larger negatives (4×5 inches or bigger) work best for contact printing, though you can also use an enlarger if you have darkroom access.
Brushes and Application Tools: Soft, wide brushes (2-3 inches) made from natural bristles or foam brushes work well for applying emulsion smoothly. Some artists prefer using sponges or even their hands (wearing gloves) for more textured applications. Keep separate brushes for emulsion application and avoid using them for other purposes.
Darkroom Chemicals: Standard black-and-white photographic chemistry is required: developer (Dektol or similar), stop bath (or white vinegar as a substitute), and fixer. These are the same chemicals used in traditional darkroom printing and are available from photography suppliers. You’ll also need trays large enough to accommodate your coated objects.
Safe Lighting: A red or amber safelight allows you to work without exposing the emulsion prematurely. LED safelights are inexpensive and effective. Alternatively, you can work in complete darkness, using a dim flashlight covered with red cellophane to check your progress occasionally.
Exposure Light Source: A bright, consistent light source is needed for exposure. Options include the sun (for outdoor exposure), a photo flood lamp, or an enlarger if you have access to a darkroom. The Getty Museum's photography collection includes historical examples of contact printing techniques that inspired modern liquid emulsion practices.
Glass or Plexiglass: A sheet of glass or plexiglass is essential for holding your negative flat against the emulsion-coated surface during exposure. The weight of the glass ensures good contact, which is critical for sharp images. Clean it thoroughly before each use to avoid dust spots.
Step-by-Step Guide to Printing Photos on Anything
Ready to get started? Here’s a comprehensive guide to help you create your first liquid emulsion masterpiece. Take your time with each step, and remember that experimentation is part of the creative process—there’s no single “correct” way to work with this medium.
Step 1: Prepare Your Workspace and Materials
Set up your workspace in a room that can be completely darkened or under safelight conditions. Ensure your substrate is clean, dry, and free from dust or oils. If working with wood, sand it lightly with fine-grit sandpaper and wipe away any dust with a tack cloth. For fabric, pre-wash and iron it to remove wrinkles. Glass and metal should be cleaned with rubbing alcohol and allowed to dry completely.
Warm your liquid emulsion to room temperature by placing the bottle in warm (not hot) water for about 15-20 minutes. Cold emulsion is thick and difficult to brush smoothly. Prepare your darkroom chemicals according to package directions and pour them into separate trays. Arrange everything within easy reach before turning off the lights.
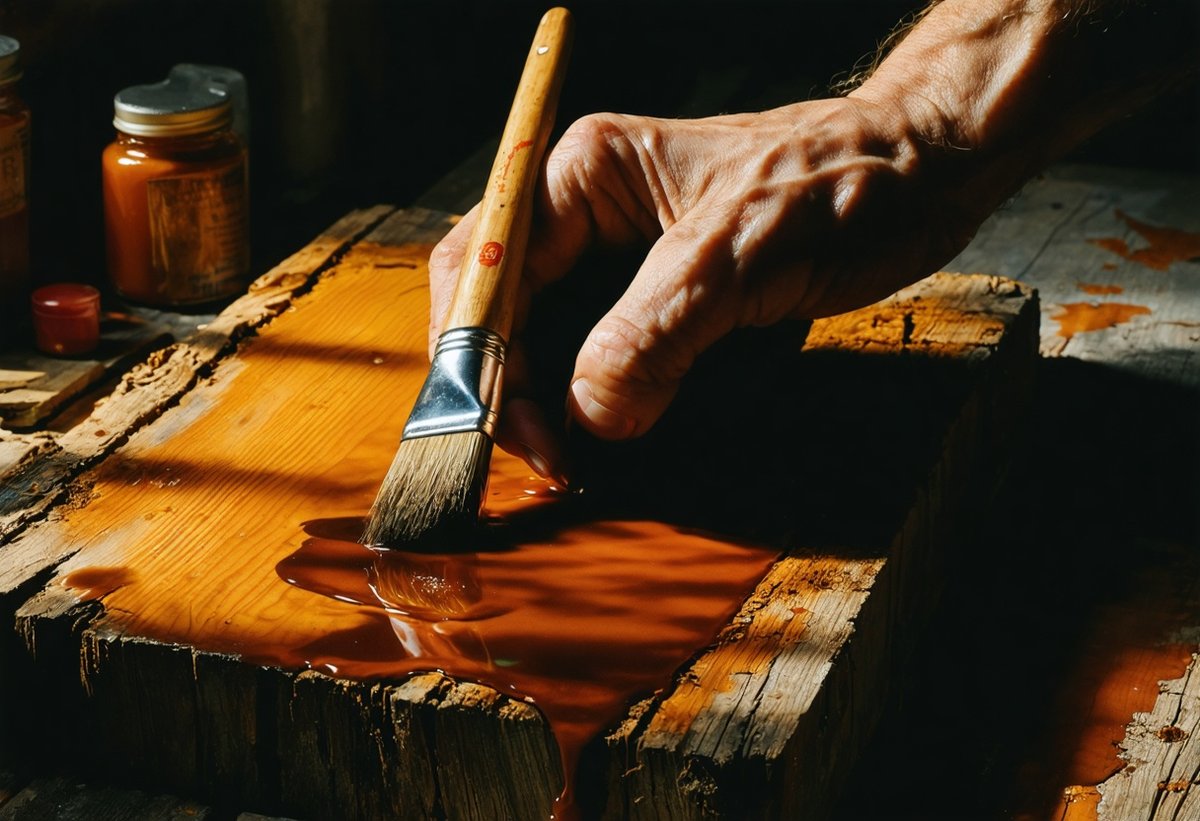
Step 2: Apply the Emulsion
Working under safelight or in complete darkness, pour a small amount of emulsion into a disposable cup or directly onto your substrate. Using smooth, even strokes, brush the emulsion across the surface. Work quickly but deliberately—the emulsion begins to set as it cools. Aim for a thin, even coat rather than a thick application, which may crack when dry.
For a more organic, painterly effect, you can apply the emulsion unevenly, allowing brush strokes to show or leaving some areas uncoated. This creates interesting edge effects and adds to the handmade quality of the final piece. Some artists apply multiple thin coats, allowing each to dry before adding the next, to build up density in specific areas.
Once applied, allow the emulsion to dry completely in total darkness. This typically takes 2-4 hours depending on humidity and the thickness of application. A fan can speed drying but shouldn’t blow directly on the emulsion to avoid dust contamination. The emulsion will change from milky white to a pale yellow-green when dry and ready for exposure.
Step 3: Create or Prepare Your Negative
While your emulsion dries, prepare your negative. If working with film negatives, select one with good contrast and density—thin, low-contrast negatives will produce weak images. For digital negatives, convert your image to black and white, adjust curves to increase contrast, and invert it to create a negative. Print on transparency film using an inkjet printer at the highest quality setting.
The size of your negative should match the area you’ve coated with emulsion. Contact printing (where the negative is placed directly on the emulsion) produces the sharpest results and is the most common approach for liquid emulsion work. Remember that your final image will be the same size as your negative and will be reversed left-to-right unless you flip the negative.
Step 4: Expose Your Image
Once the emulsion is completely dry, position your negative on top of the coated surface, emulsion side down (the dull side of the film). Place a clean sheet of glass or plexiglass over the negative to ensure firm, even contact. Any gaps between the negative and emulsion will result in soft, out-of-focus areas in your image.
Expose your setup to a bright light source. Exposure times vary dramatically depending on your light source, emulsion thickness, and negative density. As a starting point, try 30 seconds to 2 minutes with a photo flood lamp positioned 12-18 inches away. Sunlight exposures may take only 10-30 seconds on a bright day. Keep detailed notes on your exposure times and settings to build a reference for future projects.
Making test strips is highly recommended, especially when working with a new substrate or light source. Coat a small piece of the same material, and expose it in increments (covering portions of the test strip with cardboard at 15-second intervals, for example) to determine the optimal exposure time.
Step 5: Develop Your Image
After exposure, return to safelight conditions and carefully remove the negative. Your image won’t be visible yet—it’s latent and will appear during development. Immerse your piece in the developer tray, gently agitating or rocking the tray to ensure even development. Within 30-60 seconds, your image will begin to appear, gradually building in density and contrast.
Standard development time is 2-3 minutes, though you can pull the piece early for a lighter, more ethereal effect or extend development slightly for deeper blacks. Watch the image carefully—when it looks slightly darker than you want the final result to be, it’s time to move to the stop bath. Images lighten slightly during fixing and drying.
Transfer your piece to the stop bath for 30 seconds to halt development, then move it to the fixer tray. Fixing typically takes 3-5 minutes and makes the image permanent and stable in light. You can turn on normal room lights once the piece has been in fixer for about a minute. Agitate occasionally to ensure thorough fixing.
Step 6: Wash and Dry
After fixing, wash your piece thoroughly in running water for 10-20 minutes to remove all chemical residue. Inadequate washing will cause the image to fade or discolor over time. For delicate items or those that can’t be fully submerged, use a gentle spray or multiple changes of water, being careful not to damage the emulsion layer.
Allow your piece to air dry completely. Depending on the substrate, this may take several hours to overnight. Fabric items can be gently blotted with towels and hung to dry. Wood pieces should be laid flat to prevent warping. Once dry, you may notice that the emulsion has a matte finish. Some artists prefer this natural look, while others seal their work with a matte or gloss varnish for protection and to enhance contrast.
Troubleshooting Common Issues
Like any photographic process, liquid emulsion printing comes with its share of challenges. Understanding common problems and their solutions will help you achieve better results and waste less time and materials.
Weak or Faint Images: This usually indicates underexposure or underdevelopment. Increase your exposure time in increments of 25-50% and ensure you’re developing for the full recommended time. Check that your negative has adequate density—very thin negatives won’t produce strong images. Also verify that your emulsion hasn’t expired and has been stored properly in the refrigerator.
Muddy or Overly Dark Images: Overexposure is the typical culprit. Reduce exposure time or move your light source farther away. Alternatively, your negative may have insufficient contrast. When creating digital negatives, increase the curve adjustment to create more separation between highlights and shadows.
Uneven Development or Splotchy Areas: This often results from uneven emulsion application. Apply thinner, more consistent coats and ensure the emulsion is warm enough to brush smoothly. Splotches can also occur if the emulsion wasn’t completely dry before exposure or if development was uneven. Make sure to agitate consistently during development.
Emulsion Peeling or Flaking: Poor adhesion to the substrate is the issue here. Ensure surfaces are properly prepared—clean, dry, and slightly roughened if necessary. Some surfaces, particularly very smooth or oily materials, may need a primer coat or additional preparation. Avoid applying emulsion too thickly, as heavy coats are more prone to cracking and peeling.
Soft or Blurry Images: This indicates poor contact between the negative and emulsion during exposure. Use heavier glass to press the negative firmly against the surface, and ensure both the negative and emulsion surface are perfectly flat. Warped negatives can be gently flattened before use.
Advanced Techniques and Creative Variations
Once you’ve mastered the basics, liquid emulsion offers numerous opportunities for experimentation and creative exploration. These advanced techniques can help you develop a distinctive artistic style and push the boundaries of what’s possible with this versatile medium.
Toning for Color Effects
After development and fixing, you can tone your liquid emulsion prints to add color and enhance archival stability. Sepia toning creates warm brown tones reminiscent of vintage photographs, while selenium toning produces subtle purple-brown hues and significantly improves longevity. Blue toners create cool, cyanotype-like effects. Toning must be done before the final wash, and different substrates may accept toners differently, creating unique results.
Multiple Exposures and Layering
Create complex, layered images by making multiple exposures on the same emulsion coating. After the first exposure and development, you can apply a second coat of emulsion and expose a different negative. This technique allows you to combine images, add text, or create photomontages directly on your substrate. Each layer adds depth and complexity to the final piece.
Selective Coating and Masking
Rather than coating an entire surface, apply emulsion only to specific areas to create vignettes, borders, or irregular shapes. Use tape, stencils, or frisket film to mask areas you want to keep emulsion-free. This technique is particularly effective on wood, where the natural material becomes part of the composition, or on fabric, where you can create photographic patches that integrate with the textile’s pattern or color.
Hand-Coloring and Mixed Media
After your emulsion print is completely dry, enhance it with hand-applied color using oil paints, watercolors, colored pencils, or markers. This combination of photographic and traditional art techniques creates unique hybrid works. You can also incorporate other materials—collage elements, embroidery on fabric pieces, or wood burning on wooden substrates—to further personalize your work.
Photograms and Camera-less Images
You don’t need a negative to create images with liquid emulsion. Place objects directly on the coated surface and expose them to light, similar to creating lumen prints or photograms. Transparent and translucent objects create particularly interesting effects, casting shadows and allowing varying amounts of light to reach the emulsion. This technique connects liquid emulsion work to the earliest photographic experiments and offers endless creative possibilities.
Preserving and Displaying Your Liquid Emulsion Art
Once you’ve created your liquid emulsion masterpiece, proper care will ensure it remains beautiful for years to come. The emulsion layer is more delicate than traditional photographic prints and requires some special consideration.
For pieces on wood, metal, or other rigid substrates, consider applying a protective coating. Matte or gloss acrylic spray varnish provides a protective barrier against moisture, fingerprints, and UV light while enhancing the visual impact of your image. Apply several thin coats rather than one heavy coat to avoid disturbing the emulsion. Test your varnish on a sample piece first to ensure compatibility.
Fabric pieces should be handled gently and stored flat or carefully rolled with acid-free tissue paper. If you plan to wash fabric items (like a denim jacket or tote bag), do so very gently by hand in cool water with mild soap. Avoid scrubbing the image area, and air dry flat. The emulsion will become more fragile when wet, so handle with extra care during washing.
Display your liquid emulsion art away from direct sunlight, which can fade the image over time. While the silver-based emulsion is more stable than many inkjet prints, UV light will eventually cause deterioration. If displaying in bright areas, use UV-protective glass or acrylic, or apply a UV-protective varnish to the piece itself.
For three-dimensional objects like mugs or decorative items, keep in mind that the emulsion is not waterproof or dishwasher safe. These pieces are best suited for display rather than heavy functional use, though they can certainly be handled and enjoyed as long as they’re treated gently.
The Artistic Context: Liquid Emulsion in Contemporary Photography
Liquid emulsion printing exists at the intersection of traditional photographic technique and contemporary art practice. As digital photography has become ubiquitous, many artists have turned to alternative processes as a way to slow down, engage more physically with their work, and create objects that resist easy reproduction.
The technique aligns with broader movements in contemporary art that value handmade processes, materiality, and the unique object. Each liquid emulsion print is truly one-of-a-kind—even if you try to recreate the same image on the same type of substrate, subtle variations in coating, exposure, and development will make each piece unique. This stands in stark contrast to digital photography’s perfect reproducibility.
Many contemporary photographers use liquid emulsion as part of a broader exploration of what photography can be. The Museum of Modern Art’s photography collection includes works by artists who have pushed photographic boundaries through experimental techniques. By applying photographic images to unexpected surfaces and combining photography with other art forms, liquid emulsion practitioners challenge traditional notions of what constitutes a photograph.
The process also invites collaboration between photographer and viewer. When you encounter a photograph printed on weathered wood or vintage fabric, you’re experiencing not just the captured image but also the history and character of the object itself. The substrate becomes as much a part of the artwork as the photograph, creating layers of meaning and association.
Learning Resources and Community
If you’re serious about exploring liquid emulsion printing, connecting with the broader alternative process photography community can accelerate your learning and inspire new creative directions. The Royal Photographic Society offers resources and exhibitions featuring alternative processes, while many university photography programs include alternative process courses in their curricula.
Online forums and social media groups dedicated to alternative process photography provide spaces to share work, ask questions, and learn from experienced practitioners. Many photographers generously share their techniques, exposure times, and problem-solving strategies. Don’t hesitate to reach out to artists whose work you admire—the alternative process community tends to be welcoming and collaborative.
Workshops and classes offer hands-on instruction and the opportunity to work with experienced instructors who can troubleshoot problems in real-time. Many art centers, photography schools, and community darkrooms offer liquid emulsion workshops. These intensive learning experiences can help you overcome initial challenges and develop confidence in the technique much more quickly than working alone.
Books on alternative process photography, such as Christina Z. Anderson’s “The Experimental Darkroom,” provide comprehensive technical information along with creative inspiration. Building a reference library of alternative process books gives you resources to consult as you develop your practice and experiment with new techniques.
Embrace the Magic of Liquid Emulsion
The magic of liquid emulsion empowers anyone to become an artist, turning the ordinary into the extraordinary. Whether you’re looking to personalize gifts, decorate your space, or simply explore a new creative avenue, this process offers endless opportunities for self-expression and artistic growth. The tactile, hands-on nature of the work provides a welcome counterpoint to our increasingly digital lives.
Unlike many photographic techniques that demand precision and technical perfection, liquid emulsion rewards experimentation and embraces imperfection. The soft edges, organic textures, and unpredictable interactions between image and substrate create artwork that feels warm, human, and deeply personal. Each piece carries the marks of its making—the brush strokes, the slight variations in coating, the unique character of the chosen surface.
As you develop your liquid emulsion practice, you’ll discover your own aesthetic preferences and technical approaches. Some artists love the rough, expressive quality of heavily textured wood, while others prefer the delicate luminosity of images on silk. Some coat emulsion thickly and evenly for maximum image clarity, while others apply it loosely and irregularly for a more abstract effect. There’s no single correct approach—only the one that resonates with your creative vision.
So, what are you waiting for? Dive into the world of liquid emulsion and start transforming everyday objects into personal masterpieces. With a brush in hand and a sprinkle of creativity, you can create visually stunning, emotionally resonant art that’s uniquely yours. The journey from that first uncertain brush stroke to a finished piece you’re proud to display is deeply rewarding. Embrace the possibilities, learn from your experiments, and let your imagination run wild as you print photos on anything and everything. Happy printing!