The photography world is experiencing a seismic shift that few saw coming. While Adobe Lightroom has dominated photo editing for nearly two decades, a growing wave of professional photographers is making an unexpected migration to DaVinci Resolve—a tool traditionally reserved for Hollywood colorists and video editors. This isn't just about software preferences; it's a fundamental reimagining of what's possible when photographers embrace the same color science that shapes your favorite films. If you've ever wondered why your photos don't quite capture that cinematic depth you're chasing, the answer might lie in abandoning traditional photo editors altogether.

The Cinematic Revolution: Why Video Tools Are Conquering Still Photography
The boundary between motion and still imagery has been dissolving for years, but 2025 marks the tipping point. DaVinci Resolve, developed by Blackmagic Design, has become the industry standard for color grading in film and television—used on everything from Netflix originals to Marvel blockbusters. What photographers are discovering is that the same sophisticated color science that makes movies visually stunning can transform still images in ways that traditional photo editors simply cannot match.
The free version of DaVinci Resolve includes nearly all the professional features, making it an irresistible proposition for photographers tired of Adobe's subscription model. But price isn't the primary driver—it's capability. The software's node-based color grading system, advanced HDR tools, and ACES color management workflow offer a level of precision and creative control that feels like upgrading from a bicycle to a sports car.1
Professional colorists have spent years developing techniques that photographers are now adopting. The result? Images that don't just look processed—they feel crafted, with the same tonal depth and color sophistication you'd expect from a Blade Runner 2049 still frame. This is particularly relevant for photographers working in genres that demand atmospheric storytelling, from night photography to editorial portraiture.
Understanding DaVinci Resolve's Node-Based Workflow: A Paradigm Shift
If you're coming from Lightroom, the first time you open DaVinci Resolve's Color page can feel disorienting. Instead of sliders stacked vertically, you're confronted with nodes—interconnected boxes that process your image sequentially. This isn't just a different interface; it's a fundamentally different philosophy about how color grading should work.

The Power of Serial and Parallel Processing
In Lightroom, every adjustment happens simultaneously in a predetermined order. Move the exposure slider, and you're affecting the entire image before any other adjustments are considered. DaVinci Resolve's node system lets you create custom processing chains where each node performs a specific task—one for exposure correction, another for color balance, a third for skin tone refinement, and so on.
The real magic happens with parallel nodes, which allow you to process different parts of your image simultaneously and then blend them together. Imagine being able to apply completely different color treatments to shadows and highlights, then seamlessly merge them with precise control over the transition. This is standard practice in cinema and now accessible to still photographers.
This approach mirrors the careful consideration required in capturing radiant skin tones, where different elements of an image require individual attention while maintaining overall harmony. The node system makes this level of refinement not just possible, but intuitive once you understand the workflow.
Non-Destructive Editing on Steroids
Both Lightroom and DaVinci Resolve offer non-destructive editing, but Resolve takes it further. You can save entire node trees as presets, apply them to other images, and modify individual nodes without affecting the rest of your grade. Need to adjust just the color balance without touching your carefully crafted contrast curve? Simply modify that specific node. Want to try a completely different creative direction? Disable your current nodes and build a new tree alongside the original.2
Color Science Showdown: Why Resolve's Engine Produces Superior Results
The technical foundation of color grading matters more than most photographers realize. DaVinci Resolve was built from the ground up for professional color work, with a 32-bit float color processing engine that preserves an extraordinary amount of tonal information throughout the grading process. This isn't marketing speak—it's the difference between colors that feel alive and colors that feel digitally manipulated.
Lightroom uses a different approach, optimized for speed and the typical adjustments photographers make to thousands of images. It excels at batch processing and quick corrections. But when you're pushing colors into creative territory—the kind of distinctive looks that define a photographer's signature style—Resolve's color engine provides significantly more headroom before colors break apart or skin tones turn radioactive.
The difference becomes obvious when working with challenging lighting situations. Take underwater photography, where color correction requires massive shifts to restore natural tones. Resolve's color engine can recover and reshape these extreme color casts while maintaining smooth gradations and believable skin tones—something that would produce artifacts in less sophisticated systems.
HDR and Wide Color Gamut Support
As cameras capture increasingly wide dynamic ranges and color gamuts, editing software needs to keep pace. DaVinci Resolve offers native HDR grading tools, including HDR scopes, tone mapping controls, and the ability to work in multiple color spaces simultaneously. You can grade in Rec.2020 or DCI-P3 and have Resolve automatically generate versions for sRGB delivery—essential as display technology evolves beyond the limitations of standard color spaces.
This matters even if you're not shooting HDR currently. The expanded color processing preserves more information from your RAW files, giving you greater flexibility in post-production. Colors remain pliable and responsive rather than becoming brittle when pushed into creative territory. For photographers interested in commercial work and marketing photography, this capability ensures images maintain their impact across various media and display technologies.
The Learning Curve: Is It Worth the Investment?
Let's be honest: DaVinci Resolve has a steeper learning curve than Lightroom. The interface was designed for professional colorists working in dark rooms on calibrated monitors, not for photographers accustomed to intuitive sliders. You'll need to invest time understanding concepts like lift/gamma/gain, color wheels, and qualifier masks. The question is whether this investment pays dividends.
For photographers creating distinctive, cinematic work—editorial, fashion, fine art, or commercial imagery where color grading defines the aesthetic—the answer is an emphatic yes. The learning curve typically takes 20-40 hours of focused practice to reach competency, after which you'll have capabilities that simply don't exist in traditional photo editors. Many photographers report that this investment fundamentally changed their approach to color, making them better image-makers even when they occasionally return to Lightroom for specific tasks.
The official Blackmagic Design training resources are surprisingly comprehensive and free, including a complete certification program. Combine these with the growing community of photographers sharing Resolve workflows on YouTube and forums, and the learning process becomes manageable. The key is approaching it with the mindset of learning a new creative instrument rather than just switching software.
Hybrid Workflows: The Best of Both Worlds
Many photographers aren't abandoning Lightroom entirely but rather developing hybrid workflows that leverage each program's strengths. A common approach: use Lightroom for initial culling, basic exposure corrections, and lens corrections, then export select images to DaVinci Resolve for creative color grading. This combines Lightroom's efficient cataloging and batch processing with Resolve's superior color tools.3
Another approach gaining traction: use Capture One for RAW processing and file management, then move to DaVinci Resolve for color grading. Capture One's RAW conversion is highly regarded, and its session-based workflow integrates well with Resolve's project structure. The point isn't to find one perfect tool but to build a workflow that delivers the results you're after.
Practical Color Grading Techniques for Photographers
Understanding the theory is one thing; applying it to create compelling images is another. Here are specific techniques that photographers are using in DaVinci Resolve to achieve results impossible in traditional photo editors.
The Film Emulation Workflow
One of the most popular reasons photographers migrate to Resolve is its superior film emulation capabilities. Rather than applying a simple LUT (Look-Up Table) as you might in Lightroom, you can build authentic film looks using the same techniques cinema colorists employ. This starts with a proper conversion from your camera's color space to a film-like response curve, then adding grain structure, halation, and color characteristics specific to particular film stocks.
A typical film emulation node tree might include: (1) a color space transform node converting from your camera's color science to DaVinci Wide Gamut, (2) a contrast node establishing the film's characteristic S-curve, (3) color balance nodes for the specific hue shifts of your target film stock, (4) a grain node with carefully tuned size and intensity, and (5) a final output transform to your delivery color space. Each step is adjustable and can be saved as a template for future images.
Selective Color Grading with Power Windows and Qualifiers
DaVinci Resolve's masking tools—called Power Windows—combined with color qualifiers allow for selective grading that makes Lightroom's adjustment brushes feel primitive. You can isolate specific hue ranges (like warming only the golden tones in a sunset without affecting blues), create precise geometric masks with adjustable feathering, or even track moving subjects through video clips if you're working with cinemagraphs or hybrid content.
For portrait photographers, the ability to create a qualifier that targets only skin tones—then apply subtle adjustments exclusively to those areas—is transformative. You can warm skin independently from the background, smooth skin tone variations without affecting texture, or create the kind of separation between subject and environment that defines high-end editorial work. This level of control is particularly valuable when working with street photography where you want to emphasize your subject within complex, colorful environments.
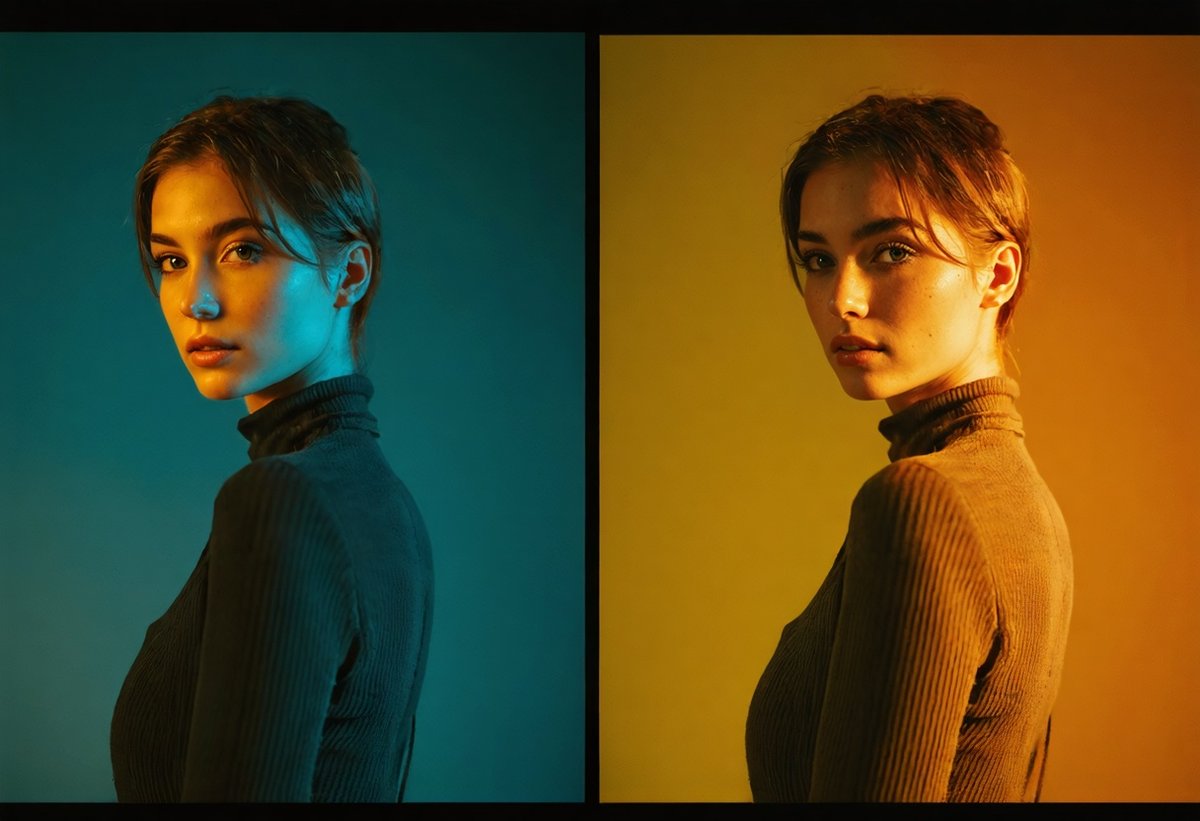
The Cinematic Color Palette: Teal and Orange Done Right
The teal-and-orange look has become synonymous with modern cinema, but it's frequently misapplied in photography, resulting in garish, over-processed images. DaVinci Resolve allows you to create sophisticated versions of this aesthetic by working with complementary colors in a controlled, nuanced way.
The professional approach uses separate nodes to: (1) establish overall contrast and exposure, (2) shift shadows toward teal using the lift color wheel, (3) push highlights toward warm tones using the gain wheel, (4) desaturate mid-tones slightly to prevent oversaturation, and (5) refine skin tones to maintain natural appearance despite the stylized environment. The result feels cinematic rather than processed—colors that enhance mood without screaming "Instagram filter."4
Common Mistakes When Transitioning from Lightroom to DaVinci Resolve
The migration from Lightroom to DaVinci Resolve comes with predictable pitfalls. Understanding these in advance can save weeks of frustration and accelerate your mastery of the new workflow.
Overcomplicating the Node Tree
New users often create unnecessarily complex node structures, thinking more nodes equal better results. In reality, professional colorists typically use 6-10 nodes for most grades, each with a clear purpose. Start simple: one node for primary balance, one for contrast, one for creative color, one for skin tones, and one for final output adjustments. You can always add complexity later as specific needs arise.
The key is intentionality. Each node should have a specific job, clearly labeled so you can return to the project months later and understand your decisions. Avoid the temptation to make every possible adjustment in a single node—this defeats the purpose of the node-based system and makes later modifications difficult.
Ignoring Color Management and Working Color Space
Lightroom handles color management automatically, which is convenient but limits control. DaVinci Resolve requires you to understand and configure your color management pipeline. This seems intimidating initially but provides crucial advantages. The most common mistake is working in the wrong color space or failing to set up proper input and output transforms.
For most photographers, the recommended approach is: set your timeline color space to DaVinci Wide Gamut/Intermediate, use the Color Space Transform plugin to convert from your camera's color space on input, and add another Color Space Transform at the end of your node tree to convert to your delivery space (typically sRGB or Display P3). This workflow preserves maximum color information throughout the grading process while ensuring accurate output.
Pushing Adjustments Too Far Too Fast
DaVinci Resolve's powerful tools make it easy to create dramatic looks quickly—sometimes too quickly. The most sophisticated color grades often involve subtle adjustments across multiple nodes rather than aggressive moves in a single node. Professional colorists frequently work with adjustments that individually seem barely visible but combine to create compelling, cohesive images.
A useful discipline: after completing a grade, go back through each node and reduce its intensity by 20-30%. Often, the result will be stronger—more refined and less obviously processed. The goal is images that feel elevated rather than manipulated, where viewers respond to the mood and atmosphere without consciously noticing the color work.
Hardware Requirements and Performance Considerations
DaVinci Resolve is more demanding than Lightroom, particularly when working with high-resolution RAW files. Understanding the hardware requirements helps avoid frustration and ensures smooth performance.
The minimum viable system for serious work includes: a modern multi-core processor (6 cores or more), 32GB of RAM, a dedicated GPU with at least 4GB of VRAM, and fast storage (SSD or NVMe drives). Resolve leverages GPU acceleration extensively, making a capable graphics card more important than in traditional photo editing. NVIDIA and AMD cards both work well, though NVIDIA's CUDA acceleration provides slight advantages in some operations.
For photographers working with 50+ megapixel files, 64GB of RAM and a high-end GPU (NVIDIA RTX 4070 or better) provide noticeably smoother performance. The Studio version of DaVinci Resolve ($295 one-time purchase) includes additional GPU acceleration and noise reduction tools that can justify the investment for professional work.5
Storage workflow matters significantly. Working from fast local drives (NVMe SSDs) provides the best performance, with archived projects stored on larger, slower drives. Many photographers use a tiered system: active projects on fast internal storage, recent projects on external SSDs, and archived work on conventional hard drives or cloud storage.
Building Your Cinematic Color Grading Library
One of DaVinci Resolve's most powerful features is the ability to save and reuse your color grades. Unlike Lightroom presets, which are relatively simple adjustment collections, Resolve's PowerGrades preserve entire node structures, including masks, qualifiers, and complex processing chains. This allows you to build a personal library of sophisticated looks that can be applied and modified across projects.
The key to building an effective library is organization and intentionality. Rather than saving every grade you create, focus on developing refined, versatile looks that work across multiple scenarios. Professional colorists typically maintain libraries organized by: (1) correction grades (basic balance and exposure fixes), (2) stylistic grades (specific creative looks), (3) technical grades (film emulations, color space conversions), and (4) finishing grades (final polish and output preparation).
Start by analyzing images you admire—whether from cinema, high-end photography, or fine art. Use Resolve's color tools to reverse-engineer these looks, understanding how specific color relationships create particular moods. This process develops your color intuition while building practical tools you can apply to your own work. The American Society of Cinematographers publishes technical articles about color grading approaches in major films, providing insights into professional techniques.
Creating Consistent Looks Across Projects
For photographers developing a signature style—essential for building a recognizable brand—DaVinci Resolve's tools enable unprecedented consistency. You can create a master node tree that establishes your aesthetic foundation, then apply it across all your work with adjustments for specific images. This is how cinematographers maintain visual consistency across entire films, and it works equally well for photographers building cohesive portfolios or maintaining brand consistency in commercial work.
The workflow typically involves: (1) developing your signature look on a diverse set of test images, (2) saving this as a PowerGrade or project template, (3) applying it to new images as a starting point, and (4) making image-specific adjustments while maintaining the core aesthetic. This approach is particularly valuable for photographers working in series or creating bodies of work meant to be viewed together, where visual coherence matters as much as individual image quality.
The Professional Advantage: Why Commercial Photographers Are Making the Switch
Beyond creative capabilities, professional photographers are migrating to DaVinci Resolve for practical business reasons. The software's database structure allows for better project management on large commercial shoots where multiple stakeholders need to review and approve color treatments. The ability to create multiple versions of a grade—with different intensities or color directions—within a single project streamlines client presentations and revision workflows.
Color accuracy is another crucial factor. DaVinci Resolve's color management and calibration tools ensure that what you see on your monitor matches what clients see on theirs and what appears in final output—whether that's print, web, or large-format display. This level of control is essential for commercial work where brand colors must be reproduced accurately and consistently across media.
The software also facilitates collaboration in ways Lightroom cannot. Multiple colorists can work on the same project simultaneously, with changes tracked and manageable through Resolve's database system. For studios or photographers working with assistants, this capability streamlines workflows and enables specialization—one person handling technical corrections while another focuses on creative grading.
The Photo District News has documented this professional shift, noting that photographers working in fashion, automotive, and high-end commercial sectors increasingly list DaVinci Resolve proficiency alongside traditional photography skills. As client expectations evolve—influenced by the cinematic quality they see in streaming content—photographers need tools that can deliver comparable results.6
Integration with Modern Photography Workflows
The lines between still photography and motion continue blurring. Many photographers now deliver both stills and video for projects, making DaVinci Resolve's unified platform increasingly valuable. You can color grade your still images and video content in the same project, ensuring perfect consistency—something impossible when using separate tools for each medium.
This integration extends to emerging formats. Cinemagraphs—still images with subtle motion elements—are easily created and graded in Resolve. The software's timeline-based interface makes it simple to work with these hybrid formats, applying consistent color treatment across the entire piece. For photographers exploring creative boundaries or working in commercial contexts where dynamic content commands premium rates, this capability is increasingly essential.
The rise of vertical video for social media has created another integration point. Photographers can shoot stills, crop them to vertical formats, add subtle motion or parallax effects, and grade everything cohesively within DaVinci Resolve. This streamlined workflow from capture to delivery across multiple formats represents the future of content creation—and Resolve is positioned at its center.
The Future: Where Photography Post-Processing Is Heading
The migration from traditional photo editors to professional color grading software represents more than a tool change—it signals photography's evolution toward cinematic standards and hybrid content creation. As computational photography advances and cameras capture increasingly sophisticated color and dynamic range information, post-processing tools must evolve to leverage these capabilities.
DaVinci Resolve's development roadmap includes AI-assisted tools that maintain the precision of manual grading while accelerating workflows. Features like automatic subject tracking, intelligent skin tone isolation, and AI-powered color matching are being refined from video applications to still photography contexts. These tools won't replace creative decision-making but will handle technical heavy lifting, allowing photographers to focus on aesthetic choices.
The broader trend is toward unified workflows where capture, editing, color grading, and delivery happen within integrated ecosystems. Blackmagic Design's hardware—including the Pocket Cinema Camera series and URSA cameras—shares color science with DaVinci Resolve, creating seamless workflows from capture to final output. Other manufacturers are developing similar integrations, recognizing that photographers and cinematographers increasingly need tools that work together rather than in isolation.
For photographers building careers in this evolving landscape, understanding professional color grading isn't optional—it's becoming foundational. The visual language of contemporary imagery is increasingly defined by cinematic color, sophisticated tonal relationships, and the kind of refined aesthetic that only professional-grade tools can deliver. Whether you're creating moody atmospheric work or polished commercial content, these capabilities determine whether your work feels current or dated.
Making the Transition: Your Action Plan
If you're considering adding DaVinci Resolve to your workflow, approach it strategically rather than attempting to switch overnight. Here's a practical roadmap that balances learning with continued productivity:
Week 1-2: Foundation and Interface
Download the free version and complete Blackmagic's official training modules covering the interface, basic color correction, and node structure. Don't try to learn everything—focus on understanding the Color page and basic grading concepts. Practice with personal images where there's no pressure or deadline.
Week 3-4: Developing Your First Grades
Choose 10-15 images from a recent project and grade them in Resolve, focusing on creating a consistent look across the set. This teaches you to think in terms of cohesive aesthetics rather than individual image adjustments. Save your node structures as PowerGrades for future use.
Month 2: Hybrid Workflow Integration
Develop a workflow that combines your existing tools with Resolve. Continue using Lightroom or Capture One for cataloging and basic corrections, but export select images to Resolve for creative grading. This maintains productivity while building new skills.
Month 3+: Advanced Techniques and Specialization
Focus on techniques specific to your photography style. Portrait photographers should master skin tone refinement and selective grading. Landscape photographers might emphasize color harmony and atmospheric effects. Commercial photographers need to develop efficient client review workflows and version management.
Throughout this process, study work you admire and attempt to recreate the color treatments. This reverse-engineering approach builds intuition about color relationships and trains your eye to see beyond basic corrections into creative grading territory. The Sony Creative Space and similar manufacturer resources often feature case studies of photographers using advanced color grading techniques.
Conclusion: The New Standard for Serious Photographers
The shift from Lightroom to DaVinci Resolve isn't about following trends—it's about accessing capabilities that define contemporary visual aesthetics. As audiences become more sophisticated and expectations rise, photographers need tools that can deliver cinematic quality and refined color science. DaVinci Resolve provides these capabilities without the compromises inherent in software designed primarily for different purposes.
This doesn't mean Lightroom is obsolete or that every photographer should abandon it immediately. But for those creating work where color grading defines the aesthetic—editorial, fashion, fine art, commercial, or any photography meant to stand alongside cinema and high-end video content—DaVinci Resolve offers capabilities that are increasingly essential rather than optional.
The learning investment is real, but so are the returns. Photographers who master these tools report not just better results but transformed approaches to color and light. They think differently about how images should look, freed from the limitations of traditional photo editors. Their work develops a sophistication and consistency that sets it apart in crowded markets.
The question isn't whether professional color grading tools will become standard for serious photographers—they already are. The question is whether you'll be early in adopting these capabilities or late. In 2025, as the photography industry continues its evolution toward cinematic standards and hybrid content creation, DaVinci Resolve represents not just an alternative to Lightroom but a glimpse into the future of image-making itself. The photographers thriving in this new landscape will be those who embrace these tools and the creative possibilities they unlock.
- ACES (Academy Color Encoding System) is a color management framework developed by the Academy of Motion Picture Arts and Sciences, designed to ensure consistent color reproduction across different cameras, displays, and workflows.
- DaVinci Resolve stores all adjustments in a database or sidecar files, meaning your original RAW files remain completely untouched regardless of how aggressive your grading becomes.
- When exporting from Lightroom to DaVinci Resolve, use TIFF or DNG formats at 16-bit depth to preserve maximum color information. Avoid JPEG, which will limit your grading flexibility.
- The teal-and-orange aesthetic works because these colors are complementary on the color wheel, creating visual tension while allowing skin tones (which fall in the orange range) to remain prominent against cooler backgrounds.
- The free version of DaVinci Resolve limits export resolution to 4K (3840x2160), which is sufficient for most photography work but may be restrictive for large prints or commercial projects requiring maximum resolution.
- Major advertising agencies now specifically request deliverables color-graded in DaVinci Resolve for campaigns that span both still and motion content, ensuring visual consistency across all media.