Embarking on a vacation is a chance to break free from the ordinary, immerse yourself in the unknown, and create treasured memories. While daylight offers picturesque vistas and vibrant scenes, it is when the sun sets that a whole new world emerges, bathed in mystery and magic. Night photography unlocks this enchanting realm, allowing you to capture moments that are as fleeting as they are mesmerizing. Join us on a journey through the art of night photography, as we explore techniques and tips to transform your vacation into a gallery of ethereal beauty.
Unveiling the Enchantment of Night Photography
When night falls, the world undergoes a vibrant transformation. Gone are the hustle and bustle of the day; instead, a serene stillness takes over, and with it comes a new kind of allure. Night photography holds the power to capture this enchantment, immortalizing the beauty that emerges under the cover of darkness. With each click, the camera reveals a world drenched in mystery, where lights twinkle like terrestrial stars and shadows linger, telling stories of their own.
The night paints the sky with a palette of deep blues, purples, and blacks, offering a stunning backdrop for your photographs. Urban landscapes come alive with the glow of streetlights and neon signs, while natural settings whisper with the subtle play of moonlight on water or the silhouette of trees against a starry sky. Each scene is an invitation to explore the intricate dance of light and shadow, to uncover the beauty that thrives when the sun takes its rest.
Yet, night photography is more than just art; it is a celebration of life’s more mysterious side. It challenges us to see beyond what is readily visible, to search for beauty in places often overlooked. When you capture a striking image at night, you are not just photographing a scene; you are encapsulating an experience, a feeling, an emotion. This approach shares similarities with moody photography, where shadows become narratives and darkness transforms into a storytelling medium. This is the enchantment that night photography brings to your vacation—it allows you to see and feel a destination in a deeply profound way.
Why Night Photography Matters for Travel Memories
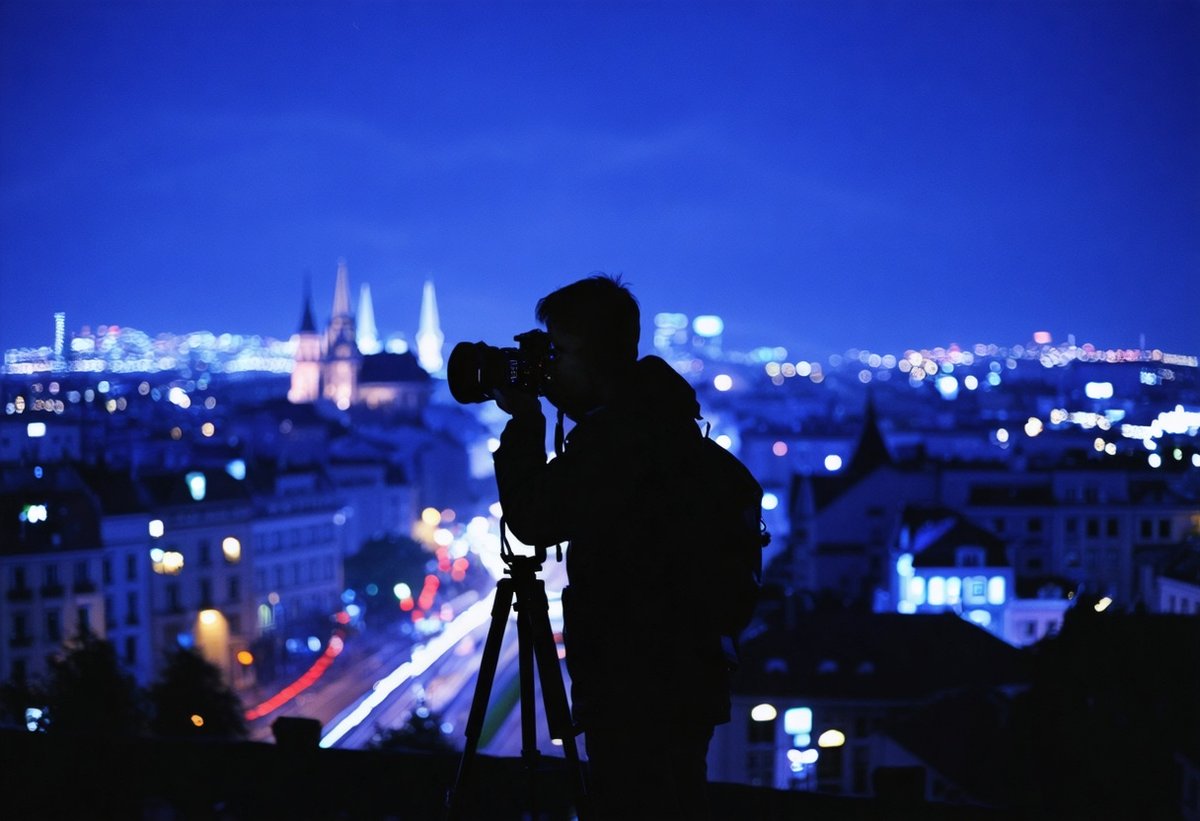
Most travelers photograph their destinations during daylight hours, capturing the same iconic views that millions have photographed before. Night photography offers something different: a unique perspective that reveals the hidden character of a place. Cities transform into glowing wonderlands, natural landscapes take on otherworldly qualities, and familiar landmarks become mysterious and new.
Consider the difference between photographing the Eiffel Tower at noon versus capturing it illuminated against a twilight sky, with light trails from passing boats on the Seine below. The night version tells a richer story—one of romance, movement, and the living pulse of Paris after dark. These are the images that will stand out in your travel portfolio, the ones that capture not just what a place looks like, but what it feels like.

Night photography also slows you down in the best possible way. Unlike rapid-fire daytime shooting, night photography requires patience, contemplation, and connection with your environment. You’ll spend time in locations after the crowds have dispersed, experiencing destinations in their most authentic, unguarded moments. This meditative quality makes night photography not just about creating images, but about deepening your travel experience itself.
Preparing for the Adventure of a Lifetime
Success in night photography begins with preparation. As the saying goes, “Failing to plan is planning to fail.” Before heading out into the night, take time to research your location. Identify spots that come alive after dark, whether it is a bustling city square, a tranquil beach under the stars, or a hidden alley with character and charm. Knowing your environment enables you to anticipate the best moments to capture, ensuring your adventure is as rewarding as it is exciting.
Consider the weather and the moon’s phases, as they can dramatically affect your night shots. Clear skies enhance celestial photography, while a full moon can provide natural illumination for landscapes. Pack appropriately, dressing in layers for temperature drops, and bring necessities like snacks and a flashlight to keep you comfortable during extended shoots. A little foresight goes a long way in ensuring your night photography experience is smooth and enjoyable.
Finally, familiarize yourself with the local culture and customs relevant to your chosen locations, respecting private property and individuals’ privacy. This awareness not only ensures a harmonious experience but also opens up opportunities to engage with locals, possibly leading to unique insights and inspiration for your photography. Thus, with comprehensive preparation, you are well on your way to capturing the magic of the night during your vacation.
Scouting Locations During Daylight
One of the most valuable night photography tips is to scout your locations during daylight hours. Visit the spots you plan to photograph at night and observe them in full light. Note potential compositions, identify foreground elements, and spot any obstacles or hazards that might be difficult to see in darkness. Take test shots to determine the best angles and perspectives.
During your daytime reconnaissance, pay attention to light sources—streetlamps, building illumination, neon signs, and other artificial lights that will become key elements in your night compositions. Use your smartphone to mark exact locations using GPS, and consider using apps like PhotoPills or The Photographer’s Ephemeris to plan shots around specific moon positions, star alignments, or the Milky Way core.
Understanding Safety Considerations
Night photography often takes you to unfamiliar places in darkness, making safety paramount. Always inform someone of your location and expected return time. Consider photographing with a companion, especially in urban environments or remote natural areas. Bring a fully charged mobile phone, wear reflective clothing if shooting near roads, and trust your instincts—if a location feels unsafe, find another spot.
Be aware of your surroundings at all times. While focusing through your viewfinder, you become vulnerable to tripping hazards, approaching vehicles, or other dangers. Use a headlamp with a red light mode to preserve your night vision while maintaining awareness of your environment. In natural settings, be mindful of wildlife, cliff edges, and changing tides or weather conditions.
Essential Gear for Nighttime Wanderings
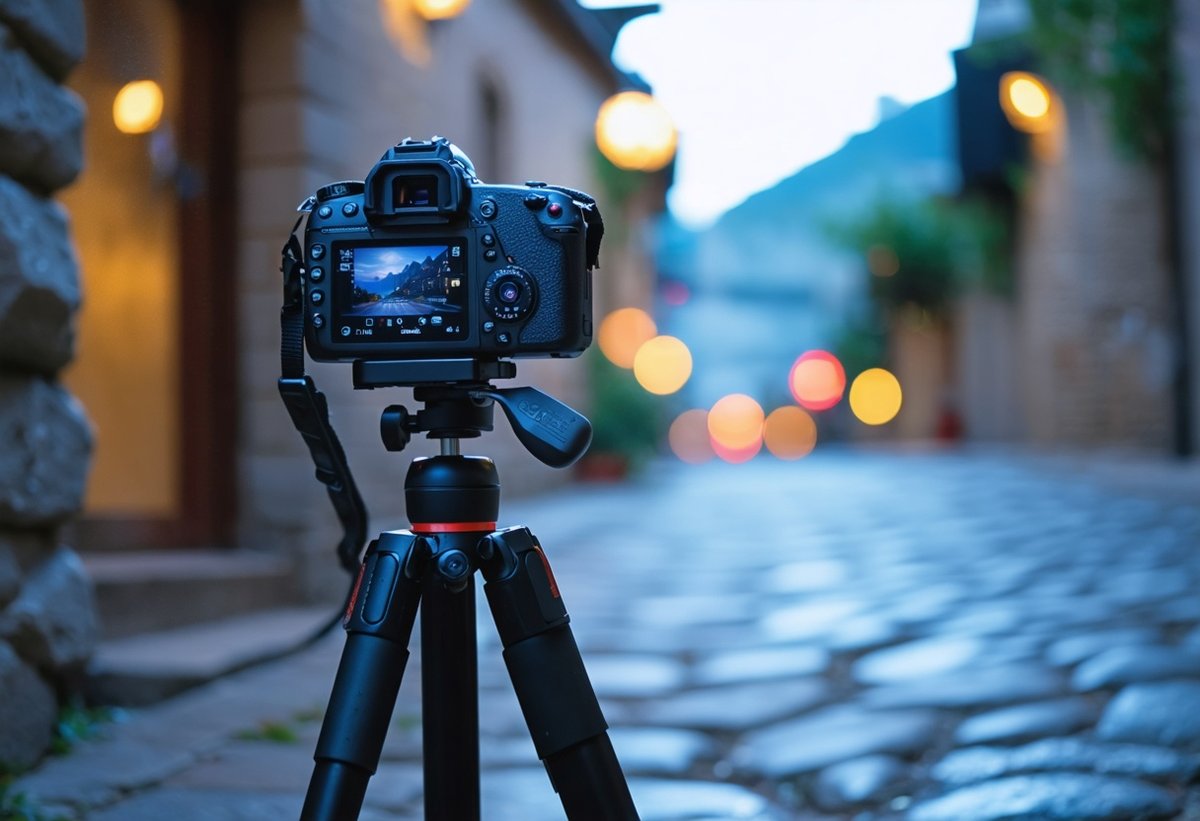
In night photography, having the right gear can make all the difference between a good shot and a breathtaking one. A tripod is your most crucial tool, providing the stability needed for long exposures, which are essential in low-light conditions. Without it, your images may suffer from unwanted blurs, losing the sharpness that defines a great photograph. Invest in a sturdy yet lightweight tripod that is easy to carry during your midnight explorations.
A good camera with manual mode capabilities is vital, allowing you to control crucial settings like ISO, shutter speed, and aperture. This control enables you to experiment with different exposures and lighting effects, capturing the night in all its beauty. A wide lens can also be beneficial, offering expansive views that are perfect for nightscapes and celestial photography. Don’t forget to bring extra batteries and memory cards, as long exposure shots can quickly drain your resources.
Additional gear like a remote shutter release can further reduce camera shake during long exposures, ensuring crisp, clear images. Lens filters, such as neutral density filters, can assist in managing light from artificial sources, creating more balanced images while reducing glare. Crafting a comprehensive and reliable gear setup not only enhances your night photography but also allows you to focus on embracing the adventure that lies ahead.
Camera Bodies and Sensor Performance
Not all cameras perform equally in low-light conditions. Full-frame sensors generally capture more light and produce less noise at high ISO settings compared to crop sensors, making them ideal for night photography. However, modern APS-C and even some micro four-thirds cameras deliver impressive low-light performance that’s more than adequate for stunning night images.
Look for cameras with good high-ISO performance (clean images at ISO 3200 or higher), effective in-body image stabilization (though this matters less when using a tripod), and the ability to shoot in RAW format. RAW files preserve maximum image data, giving you greater flexibility when processing night shots, particularly when recovering shadow detail or adjusting white balance from mixed artificial lighting sources.
Lens Selection for Night Photography
Fast lenses with wide maximum apertures (f/1.4, f/1.8, or f/2.8) are invaluable for night photography. These lenses gather more light, allowing you to use lower ISO settings (reducing noise) or faster shutter speeds (reducing motion blur). For landscape and cityscape night photography, wide-angle lenses (14-35mm) excel at capturing expansive scenes with dramatic perspective.
Prime lenses often offer superior optical quality and wider apertures than zoom lenses at comparable price points. A 24mm f/1.4 or 35mm f/1.8 makes an excellent night photography companion. For astrophotography specifically, look for lenses with minimal coma (a distortion that makes stars appear comet-shaped at frame edges) and good corner sharpness. The Museum of Modern Art’s photography collection includes many examples of how lens choice influences the aesthetic qualities of night photography throughout history.
Tripod Selection and Stability
Your tripod is the foundation of sharp night photography. Choose one that’s tall enough to reach your eye level without extending the center column (which reduces stability). Carbon fiber tripods offer excellent stability while remaining lightweight—important when hiking to remote locations. Look for tripods with legs that can splay wide for low-angle shots and have spiked feet for soft ground or rubber feet for pavement.
The tripod head matters as much as the legs. Ball heads offer quick positioning, while three-way pan-tilt heads provide precise adjustments. Ensure your head can support your heaviest camera-lens combination with a safety margin. For coastal or windy conditions, consider bringing a weight bag to hang from the center column for additional stability during long exposures.
Mastering Camera Settings for Night Photography
Understanding the exposure triangle—ISO, aperture, and shutter speed—becomes critical when shooting in low light. These three elements work in concert to determine how much light reaches your sensor and how that light is recorded. In night photography, you’ll typically push these settings beyond their daytime comfort zones, requiring a solid understanding of how each affects your final image.
ISO: Balancing Sensitivity and Noise
ISO controls your camera sensor’s sensitivity to light. Higher ISO values allow you to shoot in darker conditions, but they introduce digital noise (grain) that can degrade image quality. Modern cameras handle high ISO remarkably well, but there’s always a trade-off. Start with your camera’s base ISO (typically 100 or 200) when using a tripod for static scenes, as long exposures compensate for low light without increasing noise.
For handheld night photography or capturing moving subjects, you’ll need to increase ISO. Test your camera to determine its acceptable noise threshold—the highest ISO where image quality remains satisfactory for your purposes. Many cameras produce usable images at ISO 3200 or even 6400, especially when noise reduction is applied in post-processing. Remember that some grain can add character to night images, contributing to the atmospheric quality rather than detracting from it.
Aperture: Controlling Depth and Light
Aperture serves dual purposes in night photography: controlling how much light enters your lens and determining depth of field. Wide apertures (small f-numbers like f/1.4, f/2, f/2.8) gather more light, essential for handheld night shots or capturing stars as points rather than trails. However, wide apertures create shallow depth of field, which may not be ideal for landscape scenes where you want sharpness throughout the frame.
For night landscapes and cityscapes on a tripod, consider using apertures between f/8 and f/11. These settings provide adequate depth of field while maintaining good sharpness. The longer exposure time needed at these apertures isn’t problematic when your camera is stable. For astrophotography, you’ll typically shoot wide open (f/1.4 to f/2.8) to gather maximum starlight, accepting the shallower depth of field as stars are effectively at infinity focus anyway.
Shutter Speed: Freezing or Blurring Time
Shutter speed determines how long your sensor is exposed to light and whether motion appears frozen or blurred. In night photography, shutter speeds range from fractions of a second to several minutes or even hours. For sharp stars, use the “500 rule”—divide 500 by your lens’s focal length to find the maximum shutter speed before stars begin trailing (on full-frame cameras; use 300 for APS-C sensors).
Long exposures (several seconds to minutes) create stunning effects: car lights become flowing ribbons of color, water transforms into misty smoothness, and clouds streak across the sky. Experiment with different exposure times to achieve varied effects. Use your camera’s bulb mode for exposures longer than 30 seconds, combined with a remote release or intervalometer to avoid touching the camera during exposure.
Mastering the Dance of Light and Shadows
The key to effective night photography lies in mastering the interplay between light and shadow. Unlike daylight photography, where light is abundant, night photography requires a keen eye to utilize available light sources creatively. Streetlights, vehicle headlights, and even the moon can become dynamic elements that add depth and intrigue to your compositions. Experiment with different angles and perspectives to discover how light interacts with your subject.
Long exposure photography is a magical technique that can be especially effective at night. By allowing the camera’s shutter to remain open for extended periods, you can capture movements that the human eye misses, like the flowing trails of car lights or the shimmering surface of a river. This technique transforms ordinary scenes into ethereal masterpieces, capturing the essence of movement and the passage of time, woven elegantly with stillness.
Just as important is the skill of embracing shadows. These dark, often overlooked spaces add balance and contrast to your images, creating a sense of mystery and depth. Deliberately underexposing areas of your photograph can highlight the light’s strength, drawing the viewer’s eyes to your intended focal points. By mastering this dance of light and shadows, you can elevate your night photography, capturing scenes that resonate with emotion and beauty.
Working with Artificial Light Sources
Cities at night are illuminated by a complex mix of light sources—LED streetlights, neon signs, shop windows, vehicle headlights, and architectural lighting. Each source has a different color temperature, creating a rich tapestry of warm and cool tones. Rather than fighting this mixed lighting, embrace it as a defining characteristic of urban night photography.
Position yourself to use artificial lights as compositional elements. A streetlamp can serve as a focal point, its glow creating a natural vignette. Neon signs add vibrant color accents and cultural context. Reflections of lights on wet pavement after rain create magical doubling effects that add depth and visual interest. Look for ways to balance bright light sources with darker areas, creating dynamic range that guides the viewer’s eye through your composition.
The Blue Hour: Magic Time for Night Photography
The blue hour—the period of twilight when the sun is below the horizon but residual light still colors the sky a deep, saturated blue—offers perhaps the most magical light for night photography. During this brief window (typically 20-40 minutes after sunset or before sunrise), artificial lights are bright enough to be prominent while the sky retains enough ambient light to show detail and color rather than appearing as black void.
The balance between artificial and natural light during blue hour creates images with exceptional depth and atmosphere. Cityscapes glow warmly against cool blue skies, creating pleasing color contrast. Buildings retain architectural detail rather than becoming mere silhouettes. Plan to arrive at your location early, set up your equipment, and be ready to shoot continuously as the light changes rapidly during this fleeting period.
The Art of Capturing Celestial Wonders
The night sky offers a breathtaking display of celestial wonders, each tempting you to capture its beauty. To photograph stars, planets, or even the elusive Milky Way, patience and precision are your greatest allies. Start by venturing far from urban light pollution; rural areas or elevated regions provide the clearest views of the sky’s intricacies. Allow your eyes to adjust to the darkness and look for constellations, using them as guides for framing your shots.
A wide-angle lens paired with a slow shutter speed can effectively capture the grandeur of the night sky. Setting your camera to a high ISO and a large aperture allows more light to enter, illuminating even the faintest stars. Remember to use a tripod to maintain stability during long exposures. Play with different exposure times—just long enough to capture the stars without causing trails unless that’s the desired effect, known as star trail photography.
The charm of celestial photography extends beyond the stars. Events like meteor showers, lunar eclipses, and auroras provide stunning opportunities for unique captures. Keep informed about astronomical events during your travel dates and locations to plan your shoots accordingly. Whether you’re photographing a glowing full moon over a deserted landscape or catching the vibrant hues of the Northern Lights, capturing the celestial wonders is a testament to the infinite beauty that lies above us.
Milky Way Photography Techniques
Photographing the Milky Way represents one of night photography’s most rewarding challenges. The galactic core is most visible in the Northern Hemisphere from March through October, with peak visibility in summer months. Use apps like PhotoPills or Stellarium to determine when and where the Milky Way will appear in your location. New moon phases provide the darkest skies, though a thin crescent moon can add interesting foreground illumination.
For Milky Way photography, use your widest, fastest lens (ideally f/2.8 or wider). Set your ISO between 3200-6400, depending on your camera’s noise performance and ambient darkness. Calculate your maximum shutter speed using the 500 rule to keep stars as points rather than trails. Focus manually on a bright star or distant light using live view magnification to ensure tack-sharp focus. Include interesting foreground elements—a silhouetted tree, rock formation, or architectural element—to add scale and context to the cosmic backdrop.
Star Trails: Painting with Starlight
Star trail photography creates circular patterns as Earth’s rotation causes stars to arc across the sky. This technique requires exposures ranging from 15 minutes to several hours. You can achieve star trails through a single long exposure or by stacking multiple shorter exposures in post-processing (the latter method reduces noise and prevents sensor overheating).
Point your camera toward Polaris (the North Star) to create circular trails around a central point, or aim in other directions for diagonal streaks. Use an intervalometer to capture hundreds of 30-second exposures consecutively, then stack them using software like StarStaX or Photoshop. This technique allows you to stop shooting if conditions deteriorate and provides flexibility in choosing your final trail length during post-processing.
Composition Techniques for Night Photography
Strong composition remains essential in night photography, perhaps even more so than in daylight shooting. With less visual information available, each element in your frame carries greater weight. The fundamental principles of composition—rule of thirds, leading lines, framing, symmetry, and balance—all apply to night photography, but they manifest differently in darkness.
Using Leading Lines and Light Trails
Light trails from vehicles create natural leading lines that guide viewers through your composition. Position yourself on an overpass, hillside, or elevated position overlooking a road to capture sweeping curves of red taillights and white headlights. The longer your exposure, the longer the trails, creating ribbons of light that can lead to a distant city skyline, landmark, or vanishing point.
Other leading lines emerge at night: illuminated pathways, strings of streetlights, reflections on water, or architectural elements highlighted by strategic lighting. Use these lines to create visual journeys through your images, pulling the viewer’s eye from foreground to background. Combine multiple leading lines to create depth and complexity in your compositions.
Silhouettes and Negative Space
Silhouettes work beautifully in night photography, creating bold, graphic shapes against illuminated backgrounds. Position your subject between your camera and a light source—a sunset-lit sky, city lights, or the moon—and expose for the brighter background. The subject will render as a dark shape, emphasizing form and outline over detail.
Negative space—large areas of darkness or uniform tone—becomes a powerful compositional tool at night. Don’t fear empty black areas in your frame; they create breathing room, emphasize illuminated subjects, and contribute to the mysterious atmosphere of night photography. Balance detailed, lit areas with expanses of darkness for images that feel spacious and contemplative.
Reflections and Symmetry
Water becomes a mirror at night, doubling the impact of illuminated subjects. Puddles after rain, calm lakes, rivers, or ocean surfaces reflect city lights, monuments, stars, and moon, creating symmetrical compositions with doubled visual interest. Position yourself low to emphasize reflections, and use longer exposures to smooth rippled water into glass-like surfaces.
Architectural symmetry also becomes more pronounced at night when strategic lighting emphasizes building facades, bridges, and monuments. Center your composition on symmetrical subjects, using the alignment guides in your camera’s viewfinder or LCD to ensure perfect balance. This approach creates images with formal elegance and strong visual impact.
Post-Processing Night Photography
Post-processing plays a crucial role in realizing the full potential of your night photographs. RAW files from night shoots often appear dark, noisy, and color-shifted straight from the camera. Thoughtful editing transforms these raw captures into the dramatic, atmospheric images you envisioned when pressing the shutter.
Basic Adjustments for Night Images
Begin with exposure adjustments, carefully brightening your image without blowing out highlights from light sources. Use the highlights and shadows sliders to recover detail in bright and dark areas respectively. Night images often benefit from increased contrast to separate tonal values and create punch, but avoid overdoing it, which can make images look harsh and unnatural.
White balance requires special attention with night photography’s mixed lighting. Auto white balance often struggles with artificial lights, creating unnatural color casts. Experiment with different white balance settings—sometimes a cooler temperature enhances the nocturnal mood, while warmer settings can make city lights more inviting. Don’t feel obligated to achieve “correct” white balance; prioritize what looks good and serves your creative vision.
Noise Reduction Techniques
High ISO night photography inevitably introduces noise. Modern editing software includes powerful noise reduction tools, but use them judiciously. Excessive noise reduction creates a plastic, over-smoothed appearance that strips away texture and detail. Apply luminance noise reduction to reduce graininess while preserving detail, and use color noise reduction more aggressively, as color noise is more distracting than luminance noise.
Consider embracing some grain rather than eliminating it entirely. Fine grain can add character and atmosphere to night images, evoking the aesthetic of film photography. The key is controlling noise rather than obliterating it—reduce it enough that it doesn’t distract, but allow some texture to remain for a more organic, authentic feel.
Enhancing Light and Color
Selective adjustments bring out the best in night photography. Use graduated filters to enhance skies without affecting foregrounds, or radial filters to add subtle vignetting that draws attention to your subject. Adjustment brushes allow you to selectively brighten or darken specific areas, dodging and burning to guide the viewer’s eye.
Color grading creates mood and atmosphere in night images. Enhance the warm glow of artificial lights while cooling shadows for pleasing color contrast. Use the HSL (Hue, Saturation, Luminance) sliders to adjust specific colors—boosting the saturation of neon signs, refining the blue of twilight skies, or adjusting the yellow-orange of sodium streetlights. Subtle color grading elevates night photography from documentary record to artistic interpretation.
Embracing Serendipity in Your Night Shots
While planning and technique are crucial to night photography, so too is the element of serendipity. Sometimes, the most captivating shots are the ones you stumble upon by chance. Allow yourself to wander, camera in hand, and remain open to the unexpected scenes the night might present. From a coincidental alignment of lights to an impromptu fog rolling in, these surprises often turn into the most cherished photographs of your trip.
It’s an exercise in staying alert to your surroundings, noticing the subtle changes in the environment and capturing them in the moment. Perhaps you’ll find the faint glow of a distant bonfire reflecting on water, the gentle sway of streetlights in the breeze, or the unexpected vibrancy of nocturnal wildlife. Whatever it is, embrace it. The surprise aspects often lend a layer of narrative and emotion to your collection, enriching the story captured by your lens.
Remember, the beauty of night photography lies not only in what you plan to capture but in what you discover along the way. By approaching night photography with a sense of openness and curiosity, you are more likely to capture those magical, once-in-a-lifetime moments. These serendipitous encounters add an authentic and personal touch to your vacation album, making each photo a treasured memento of your journey. This spontaneous approach connects with the philosophy behind documentary photography, where being present and receptive to unfolding moments creates the most powerful images.
Finding Beauty in Unexpected Darkness
Night photography invites us to find beauty in places others might not see. It challenges us to redefine our perception of darkness, viewing it not as an absence of light but as a catalyst for creativity. This approach encourages you to venture into spaces where shadows reign, finding elegance in the dimly lit corners and shadowy nooks that would otherwise be missed during the day.
When exploring these darker spaces, train your eye to find the subtle details that make them beautiful—the way shadows converge to form intricate patterns, how a single light source can create dramatic contrasts, or the quiet charm of a deserted street illuminated by a lone streetlamp. Use light sparingly and strategically to highlight these details, ensuring your shots remain inviting while maintaining their mysterious allure.
The beauty found in unexpected darkness is a testament to your ability to see beyond the obvious, to uncover stories hidden in the folds of night. Each photograph becomes an exploration of contrast and texture, a profound dialogue between light and obscurity. By finding beauty in these unlikely places, you enrich your own understanding of the world and the captivating stories it holds when the lights are dimmed.
Urban Exploration After Dark
Cities reveal entirely different personalities at night. Busy commercial districts that buzz with daytime activity become quiet, almost theatrical spaces after closing time. Alleyways that seem unremarkable in daylight transform into atmospheric corridors illuminated by single bulbs or neon glow. Markets, plazas, and waterfronts take on new character when crowds disperse and architectural lighting takes center stage.
Seek out these transformed urban spaces during your night photography adventures. The J. Paul Getty Museum’s photography collection includes numerous examples of how photographers throughout history have captured the nocturnal urban environment, from Brassaï’s 1930s Paris to contemporary cityscape photographers. These works demonstrate how darkness and artificial light collaborate to create mood, atmosphere, and narrative in urban photography.
Night Photography Across Different Destinations
Different travel destinations offer unique opportunities and challenges for night photography. Understanding how to adapt your approach to various environments maximizes your chances of returning home with exceptional images.
Coastal and Beach Night Photography
Beaches and coastlines offer spectacular night photography opportunities, from moonlit waves to bioluminescent phenomena. The moon reflecting on water creates a natural light path that adds depth and leads the eye. Long exposures transform waves into misty, ethereal elements that contrast beautifully with sharp rocks or pier structures. During full moons, you can capture surprising detail in coastal landscapes using exposures of 30 seconds to several minutes.
Protect your gear from salt spray and sand, using lens hoods and keeping equipment covered when not actively shooting. Coastal winds can destabilize tripods, so weight them down or position them in sheltered spots. Be mindful of tides—scout locations during daylight to understand tidal patterns and ensure you won’t be cut off or surprised by rising water during your night shoot.
Mountain and Wilderness Night Photography
Mountains and wilderness areas far from light pollution offer the darkest skies and most spectacular starscapes. High elevation provides clearer atmospheric conditions, making stars appear brighter and more numerous. Combine celestial photography with landscape elements—silhouetted peaks, alpine lakes reflecting stars, or illuminated tents creating human scale against vast cosmic backdrops.
Wilderness night photography requires extra preparation. Bring headlamps with red light modes, dress warmly for nighttime temperature drops, and carry navigation tools. Let someone know your plans and expected return time. The effort of reaching remote locations rewards you with pristine night skies impossible to capture near populated areas.
Historic Sites and Architecture at Night
Historic monuments, castles, cathedrals, and archaeological sites often feature dramatic nighttime illumination designed to showcase their architectural splendor. These sites photograph beautifully during blue hour when architectural lighting balances with ambient sky light. Research whether sites remain accessible after dark or if you can photograph from nearby public areas.
Respect any restrictions on tripod use or photography at historic sites. Some locations prohibit tripods to prevent damage or obstruction of other visitors. In such cases, increase your ISO and use image stabilization, or look for stable surfaces like walls or benches to steady your camera during longer exposures. The Royal Photographic Society offers resources and ethical guidelines for photographing historic and culturally significant sites responsibly.
Overcoming Common Night Photography Challenges
Even experienced photographers encounter challenges when shooting at night. Understanding common issues and their solutions helps you troubleshoot problems in the field and return home with successful images rather than frustrating failures.
Achieving Sharp Focus in Darkness
Autofocus systems struggle in low light, often hunting unsuccessfully or locking onto the wrong element. Switch to manual focus for night photography. Use your camera’s live view mode and magnify the display to 10x, then carefully adjust focus on a bright star, distant light, or high-contrast edge. Some photographers use a bright flashlight to illuminate a foreground subject, focus on it, then turn off the flashlight before exposing.
For landscape night photography, focus at the hyperfocal distance to maximize depth of field from foreground to infinity. Use depth of field calculators or apps to determine the optimal focus point for your lens and aperture combination. Once you’ve achieved perfect focus, tape your focus ring in place or switch your lens to manual focus mode to prevent accidental adjustment between shots.
Managing Condensation and Moisture
Temperature changes cause condensation to form on lenses and camera bodies, fogging your optics and potentially damaging electronics. When moving from warm indoor environments to cold outdoor conditions, allow your gear to acclimate gradually. Keep equipment in a sealed bag until it reaches outdoor temperature, preventing condensation from forming as warm air meets cold surfaces.
Use lens hoods to protect front elements from dew formation, and consider lens heating strips for extended shoots in humid conditions. Carry microfiber cloths to gently wipe condensation if it does form. In extremely humid environments, silica gel packets in your camera bag help absorb excess moisture and protect your equipment.
Dealing with Light Pollution
Light pollution from cities, highways, and industrial areas creates an orange or yellow glow that washes out stars and reduces contrast in night skies. While traveling to dark sky locations is ideal, you can minimize light pollution’s impact through careful positioning and post-processing. Position yourself so light sources are behind you or blocked by landscape features, and shoot away from the brightest pollution sources.
Light pollution filters that block specific wavelengths from sodium and mercury vapor lights can help when photographing stars from urban or suburban locations. In post-processing, use graduated filters to darken and neutralize the color cast in skies affected by light pollution, though this technique has limits—severe light pollution can’t be completely eliminated in editing.
Crafting Memories Under the Moonlit Sky
As you immerse yourself in night photography, every image becomes a crafted memory, a timestamp of your journey under the moonlit sky. These photographs serve as reminders of the moments when the world stood still, allowing you to quietly observe and capture its beauty. Whether it’s the silhouette of a distant mountain range under a canopy of stars or the vibrant pulse of a nocturnal city, each picture tells a story unique to your experience.
Beyond the technical and artistic aspects, night photography during your vacation is about connecting with the environment and cultivating a deep appreciation for what each location offers. As you frame each shot, you become attuned to the subtleties of the night—its sounds, smells, and the gentle hum of life that goes on unnoticed by day. These connections are imprinted into each image, making them resonant with emotion and memory.
In essence, crafting memories through night photography is a tribute to the art of seeing. It’s a celebration of finding wonder in the quiet and the dark and preserving it forever. These captured memories not only enrich your vacation experience but provide a lifelong gallery of moments shared intimately between you and the night, reminding you of the beauty that exists when the world is bathed in moonlight. Much like developing your personal aesthetic, your night photography style will evolve as you discover what resonates with you most deeply, creating a signature approach that makes your nocturnal images uniquely yours.
Building Your Night Photography Portfolio
As you accumulate night photography images from your travels, consider how to organize and present them effectively. A cohesive portfolio showcases your best work and demonstrates your mastery of night photography’s unique challenges. Select images that represent diverse approaches—cityscapes, landscapes, astrophotography, and abstract light studies—while maintaining a consistent aesthetic quality.
Edit ruthlessly, including only your strongest images. Ten exceptional night photographs make a more powerful impression than thirty good ones diluted by mediocre shots. Look for variety in composition, subject matter, and mood while ensuring technical excellence—sharp focus, appropriate exposure, and effective post-processing—across all selected images.
Consider creating themed collections from your travels: “Blue Hour Cities,” “Starscapes of the American West,” or “Nocturnal Architecture.” Themed portfolios tell cohesive visual stories and demonstrate your ability to explore subjects in depth. Share your work through photography websites, social media platforms, or even printed photo books that preserve your night photography adventures in tangible form.
Conclusion: Embracing the Night
Night photography elevates your vacation to a realm where the ordinary meets the extraordinary. Through its lens, you uncover the hidden magic that darkness conceals, crafting detailed narratives of light, shadow, and emotion. Each photograph becomes a personal keepsake, an adventure frozen in time for you to revisit and share.
The skills you develop through night photography—patience, technical mastery, compositional awareness, and creative vision—extend far beyond nocturnal shooting. These abilities enhance all aspects of your photography, training you to see light more critically, work deliberately rather than reactively, and push beyond comfortable techniques into challenging creative territory.
So embrace the challenges and enjoy the unpredictability. May every click of your shutter be a step towards capturing the ethereal beauty that only the night can offer, enriching your journey with profound memories etched under the night sky. The world after dark awaits your discovery—venture forth with your camera, and reveal the magic that emerges when the sun takes its rest.